
- اندروید
- زمان 15 دقیقه
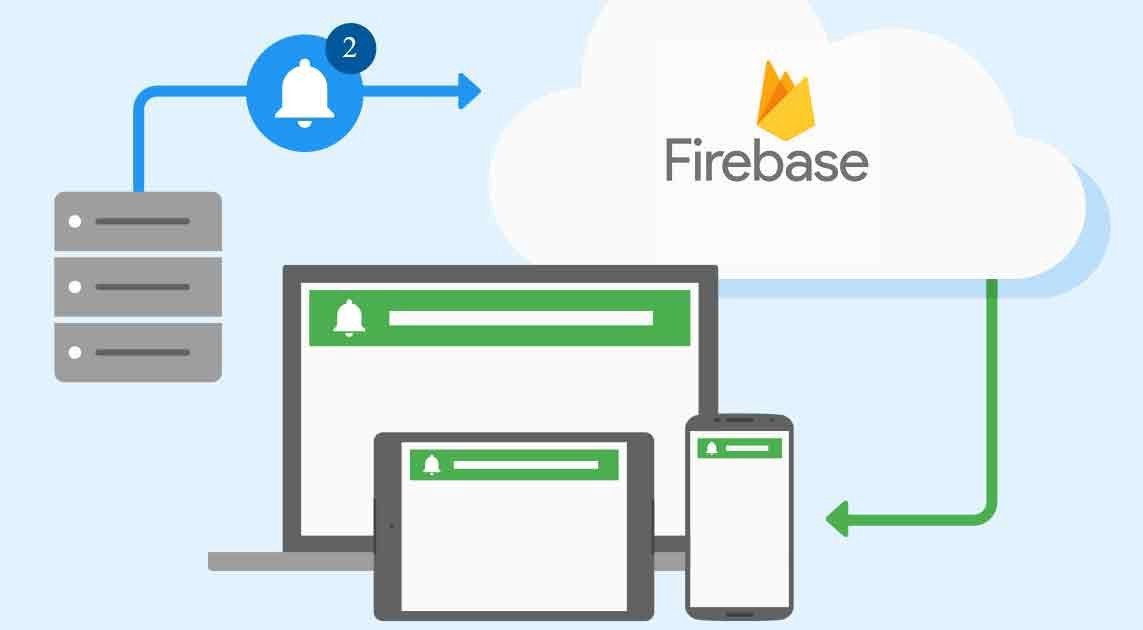
پوش نوتیفیکیشن اندروید با استفاده از Firebase Cloud Messaging) FCM & PHP)
اخیراً، گوگل از سیستم پیامرسانی ابریگوگل (GCM) به سامانه ی پیامرسانی ابری فایربیس (FCM) منتقل شده است. مشابه GCM، FCM یک راه حل پیامرسانی چند پلتفرمی است که به شما امکان ارسال پیام را میدهد. FCM کاملاً رایگان و نامحدود است. در این مقاله ما ویژگیهایFCM را مطالعه خواهیم کرد و یک اپلیکیشن ساده خواهیم ساخت. همچنین خواهیم دید که چطور فایربیس را با بکاند پروژه یکپارچه کنیم، تا بتوانید از سرور پیام ارسال کنیم. با مقاله پوش نوتیفیکیشن اندروید با استفاده از FCM & PHP و سیستم پیامرسانی ابریگوگل تیک4 همراه باشید.
- پوش نوتیفیکیشن اندروید با استفاده از Firebase Cloud Messaging) FCM & PHP)
- انواع پیامهای فایربیس
- 1.1 پیام اعلان
- 1.2 پیام داده
- 1.3 پیامهایی با هردوی اعلان و Data loaded
- هدفگیری پیام
- ارسال به یک کاربر
- 2.2 پیام رسانی موضوعی
- 3. یکپارچه سازی با ابر پیام رسانی فایربیس(firebase cloud messaging)
- مشترک شدن در یک موضوع
- خارج شدن از اشتراک یک موضوع
- ارسال پیام از کنسول فایربیس
- ارسال پیام از بک اند پی اچ پی
- 5.1 دریافت کلید ای پی آی از سرور فایربیس
-
انواع پیامهای فایربیس
با استفاده از FCM میتوانید سه نوع پیام ارسال کنید که عبارتند از: پیام اعلان(Notification Message)، پیام داده (Data Message) و پیام با هر دوی اعلان و دیتا پیلود (Data payload)
1.1 پیام اعلان
پیام اعلان با خود SDK ی فایربیس مدیریت میگردد. به طور معمول پیام اعلان شامل عنوان، پیام، آیکون و … میشود. این پیامها ممکن است از طریق رابط کاربری کنسول فایربیس ارسال شوند. با ارسال این نوع پیامها شما کنترل زیادی برروی اعلان ها نخواهید داشت. اعلان به طور خودکار وقتی که برنامه در پس زمینه در حال اجرا است نمایش داده خواهد شد.
برای ارسال اعلان پیام، شما باید از کلید notification در دادههای Json استفاده کنید. یک نمونه از اعلانات مربوط به پیام در زیر نشان داده شده است.
{
    "to": "e1w6hEbZn-8:APA91bEUIb2JewYCIiApsMu5JfI5Ak...",
    "notification": {
        "body": "Cool offers. Get them before expiring!",
        "title": "Flat 80% discount",
        "icon": "appicon"
    }
}
1.2 پیام داده
پیام داده باید با برنامهی اندروید مدیریت شود. شما میتوانید این نوع پیام را در صورتی که بخواهید دادههای اضافی همراه اعلان ارسال کنید، اضافه کنید. اما ارسال این پیامها از طریق کنسول فایربیس ممکن نیست. برای ارسال اعلان با استفاده از api ی فایربیس، احتیاج به منطق سمت سرور دارید. وقتی که می خواهید این پیام را ارسال کنید باید از کلید data استفاده کنید
یک نمونه از Json پیام داده در زیر آورده شده است.
{
   "to" : "e1w6hEbZn-8:APA91bEUIb2JewYCIiApsMu5JfI5Ak...",
   "data" : {
     "name" : "LG LED TV S15",
     "product_id" : "123",
     "final_price" : "2500"
   }
 }
1.3 پیامهایی با هردوی اعلان و Data loaded
همچنین یک پیام هم شامل اعلان و هم دادهی پیلود باشد. وقتی که این نوع پیامها فرستاده می شوند، بسته به وضعیت برنامه (اجرا در پس زمینه یا پیش زمینه) به دو صورت قابل مدیریت است. برای این پیامها ما می توانیم از کلیدهای notification و dataاستفاده کنیم
وقتی که در پس زمینه در حال اجرا است- برنامهها اعلانات پیلود را دریافت میکنند در قسمت اعلانات، و داده ی پیلود فقط وقتی که کاربر برروی اعلان ضربه می زند مدیریت می شود. وقتی که در پیش زمینه است- برنامه یک شیءپیام با هر دو پیلود دردسترس دریافت میکند. یک مورد از پیام اعلان و دادهی پیلود مورد زیر است. با ادامه مقاله پوش نوتیفیکیشن اندروید با استفاده از FCM & PHP همراه ما باشید.
{
    "to" : "e1w6hEbZn-8:APA91bEUIb2JewYCIiApsMu5JfI5Ak...",
    "notification": {
        "body": "Cool offers. Get them before expiring!",
        "title": "Flat 80% discount",
        "icon": "appicon"
    },
    "data" : {
     "name" : "LG LED TV S15",
     "product_id" : "123",
     "final_price" : "2500"
   }
}
-
هدفگیری پیام
زمانی که با فایربیس پیام ارسال میکنید، شما میتوانید مخاطبین هدف را انتخاب کنید. شما هم میتوانید به کاربر تنها ارسال کنید و هم به یک گروه کاربر با یک اسم موضوع (topic name)
-
ارسال به یک کاربر
وقتی هدف یک کاربر است، شناسه ی ثبت نام فایربیس (firebase registration id) برای تشخیص دستگاه مورد نظر استفاده میشود. Reg id باید در فیلد to از فایل Json حتماً ذکر شود.
{
  "to": "e1w6hEbZn-8:APA91bEUIb2JewYCIiApsMu5JfI5Ak...",
  "data": {
    "message": "This is a Firebase Cloud Messaging Topic Message!",
   }
}
2.2 پیام رسانی موضوعی
پیامرسانی موضوعی وقتی که تعدادی از کاربران هدف هستند مفید است. برای این کاربران باید به موضوع فایربیس مشترک شوند. به طور مثال: وقتی که میخواهید به تمام کاربرانی که علاقمند به اخبار هستند پیام بدهید شما میتوانید یک موضوع (topic) به نام اخبار ایجاد کنید و به موضوع(تاپیک) نیوز اعلان ارسال کنید. فرمت درخواست پیام موضوعی در زیر آورده شده است. در فیلد to شما باید به نام موضوع (تاپیک نیم) اشاره کنید. با ادامه مقاله پوش نوتیفیکیشن اندروید با استفاده از FCM & PHP همراه ما باشید.
{
  "to": "/topics/news",
  "data": {
    "message": "This is a Firebase Cloud Messaging Topic Message!",
   }
}
3. یکپارچه سازی با ابر پیام رسانی فایربیس(firebase cloud messaging)
ما امیدواریم اطلاعات بالا مرور خوبی بر ویژگیهای فایربیس و امکاناتی که آنها فراهم می کنند، باشد. حالا ما می خواهیم یک برنامهی ساده بسازیم که هم پیامهای کنسول فایربیس و هم پیامهای پی اچ پی را دریافت کند.
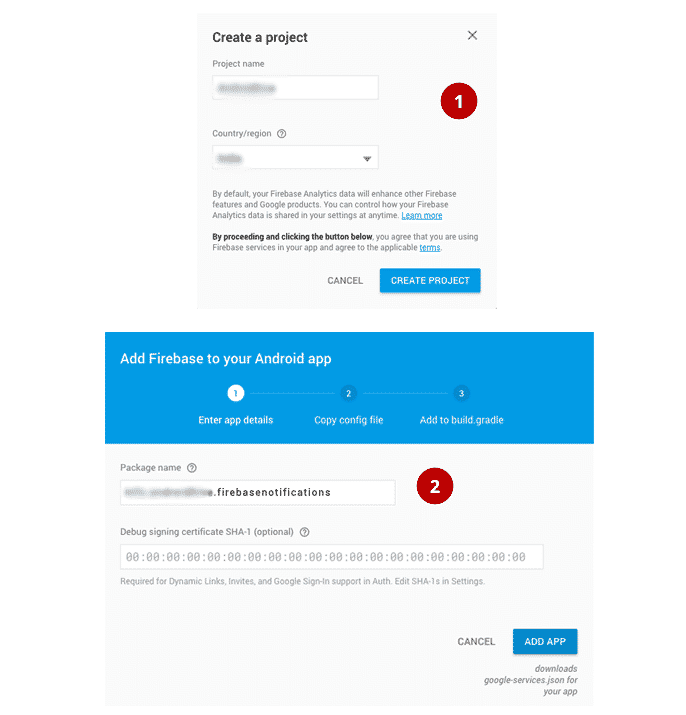
- اول باید به آدرس https://firebase.google.com/ بروید و برای دسترسی به کنسول یک حساب کاربری بسازید. بعد از اینکه به کنسول دسترسی پیدا کردید با ایجاد پروژهتان شروع کنید.
- نام پکیج پروژهتان را که میخواهید با فایربیس یکپارچه کنید تنظیم کنید(برای ما tik4.firebasenotifications است) . اینجا فایل google-services.json وقتی که روی دکمه ی add برنامه کلیک میکنید دانلود میشود.
- از قسمت File ⇒ New Project یک پروژهی جدید در اندروید استادیو ایجاد کنید. زمانی که جزئیات مربوط به پروژه را پر میکنید از همان نامی استفاده کنید که در کنسول فایربیس استفاده کرده بودید که در مورد ما tik4.firebasenotifications است.
- فایل google-services.json را در داخل پوشهی app پروژه وارد کنید. این قدم بسیار مهم است چون بدون آن پروژهی شما ایجاد نخواهد شد.
build.gradle
dependencies {
        classpath 'com.android.tools.build:gradle:2.2.0-rc1'
        classpath 'com.google.gms:google-services:3.0.0'

        // NOTE: Do not place your application dependencies here; they belong
        // in the individual module build.gradle files
    }
- فایل app/build.gradle را باز کنید و وابستگیهای مربوط به firebase messaging را اضافه کنید. در انتهای فایل apply plugin: ‘com.google.gms.google-services’ را اضافه کنید
app/build.gradle
dependencies {
    compile 'com.google.firebase:firebase-messaging:9.6.0'
}

apply plugin: 'com.google.gms.google-services'
- چهار پکیج به نامهای activity، app، service، utils، زیر پوشهی اصلی پروژه ایجاد کنید. در زیر ساختار و فایلهای مورد نیاز پروژه آمده است.
…pic…
- فایل notification.mp3 را دانلود و در پوشهی res ⇒ raw قرار دهید. این گام اختیاری است، برای زمانی که میخواهید که در هنگام دریافت اعلان صدای خاصّی را پخش نمایید(به طور سفارشی).
- کلاسی با نام Config.java در پکیج app ایجاد کنید. این کلاس شامل تمام مقادیر ثابتی است که در برنامه استفاده میکنیم.
Config.java
package tik4.firebasenotifications.app;

public class Config {

    // global topic to receive app wide push notifications
    public static final String TOPIC_GLOBAL = "global";

    // broadcast receiver intent filters
    public static final String REGISTRATION_COMPLETE = "registrationComplete";
    public static final String PUSH_NOTIFICATION = "pushNotification";

    // id to handle the notification in the notification tray
    public static final int NOTIFICATION_ID = 100;
    public static final int NOTIFICATION_ID_BIG_IMAGE = 101;

    public static final String SHARED_PREF = "ah_firebase";
}
- کلاسی به نام NotificationUtils.java در زیر پکیج utils ایجاد کنید. این کلاس شامل توابع ضروری برای نمایش پیامها (با عنوان، پیام، عکس و زمان) در قسمت اعلانات است.
NotificationUtils.java
package tik4.firebasenotifications.util;

import android.app.ActivityManager;
import android.app.Notification;
import android.app.NotificationManager;
import android.app.PendingIntent;
import android.content.ComponentName;
import android.content.ContentResolver;
import android.content.Context;
import android.content.Intent;
import android.graphics.Bitmap;
import android.graphics.BitmapFactory;
import android.media.Ringtone;
import android.media.RingtoneManager;
import android.net.Uri;
import android.os.Build;
import android.support.v4.app.NotificationCompat;
import android.text.Html;
import android.text.TextUtils;
import android.util.Patterns;

import java.io.IOException;
import java.io.InputStream;
import java.net.HttpURLConnection;
import java.net.URL;
import java.text.ParseException;
import java.text.SimpleDateFormat;
import java.util.Date;
import java.util.List;

import tik4.firebasenotifications.R;
import tik4.firebasenotifications.app.Config;

/**
 * Created by Ravi on 31/03/15.
 */
public class NotificationUtils {

    private static String TAG = NotificationUtils.class.getSimpleName();

    private Context mContext;

    public NotificationUtils(Context mContext) {
        this.mContext = mContext;
    }

    public void showNotificationMessage(String title, String message, String timeStamp, Intent intent) {
        showNotificationMessage(title, message, timeStamp, intent, null);
    }

    public void showNotificationMessage(final String title, final String message, final String timeStamp, Intent intent, String imageUrl) {
        // Check for empty push message
        if (TextUtils.isEmpty(message))
            return;


        // notification icon
        final int icon = R.mipmap.ic_launcher;

        intent.setFlags(Intent.FLAG_ACTIVITY_CLEAR_TOP | Intent.FLAG_ACTIVITY_SINGLE_TOP);
        final PendingIntent resultPendingIntent =
                PendingIntent.getActivity(
                        mContext,
                        0,
                        intent,
                        PendingIntent.FLAG_CANCEL_CURRENT
                );

        final NotificationCompat.Builder mBuilder = new NotificationCompat.Builder(
                mContext);

        final Uri alarmSound = Uri.parse(ContentResolver.SCHEME_ANDROID_RESOURCE
                + "://" + mContext.getPackageName() + "/raw/notification");

        if (!TextUtils.isEmpty(imageUrl)) {

            if (imageUrl != null && imageUrl.length() > 4 && Patterns.WEB_URL.matcher(imageUrl).matches()) {

                Bitmap bitmap = getBitmapFromURL(imageUrl);

                if (bitmap != null) {
                    showBigNotification(bitmap, mBuilder, icon, title, message, timeStamp, resultPendingIntent, alarmSound);
                } else {
                    showSmallNotification(mBuilder, icon, title, message, timeStamp, resultPendingIntent, alarmSound);
                }
            }
        } else {
            showSmallNotification(mBuilder, icon, title, message, timeStamp, resultPendingIntent, alarmSound);
            playNotificationSound();
        }
    }


    private void showSmallNotification(NotificationCompat.Builder mBuilder, int icon, String title, String message, String timeStamp, PendingIntent resultPendingIntent, Uri alarmSound) {

        NotificationCompat.InboxStyle inboxStyle = new NotificationCompat.InboxStyle();

        inboxStyle.addLine(message);

        Notification notification;
        notification = mBuilder.setSmallIcon(icon).setTicker(title).setWhen(0)
                .setAutoCancel(true)
                .setContentTitle(title)
                .setContentIntent(resultPendingIntent)
                .setSound(alarmSound)
                .setStyle(inboxStyle)
                .setWhen(getTimeMilliSec(timeStamp))
                .setSmallIcon(R.mipmap.ic_launcher)
                .setLargeIcon(BitmapFactory.decodeResource(mContext.getResources(), icon))
                .setContentText(message)
                .build();

        NotificationManager notificationManager = (NotificationManager) mContext.getSystemService(Context.NOTIFICATION_SERVICE);
        notificationManager.notify(Config.NOTIFICATION_ID, notification);
    }

    private void showBigNotification(Bitmap bitmap, NotificationCompat.Builder mBuilder, int icon, String title, String message, String timeStamp, PendingIntent resultPendingIntent, Uri alarmSound) {
        NotificationCompat.BigPictureStyle bigPictureStyle = new NotificationCompat.BigPictureStyle();
        bigPictureStyle.setBigContentTitle(title);
        bigPictureStyle.setSummaryText(Html.fromHtml(message).toString());
        bigPictureStyle.bigPicture(bitmap);
        Notification notification;
        notification = mBuilder.setSmallIcon(icon).setTicker(title).setWhen(0)
                .setAutoCancel(true)
                .setContentTitle(title)
                .setContentIntent(resultPendingIntent)
                .setSound(alarmSound)
                .setStyle(bigPictureStyle)
                .setWhen(getTimeMilliSec(timeStamp))
                .setSmallIcon(R.mipmap.ic_launcher)
                .setLargeIcon(BitmapFactory.decodeResource(mContext.getResources(), icon))
                .setContentText(message)
                .build();

        NotificationManager notificationManager = (NotificationManager) mContext.getSystemService(Context.NOTIFICATION_SERVICE);
        notificationManager.notify(Config.NOTIFICATION_ID_BIG_IMAGE, notification);
    }

    /**
     * Downloading push notification image before displaying it in
     * the notification tray
     */
    public Bitmap getBitmapFromURL(String strURL) {
        try {
            URL url = new URL(strURL);
            HttpURLConnection connection = (HttpURLConnection) url.openConnection();
            connection.setDoInput(true);
            connection.connect();
            InputStream input = connection.getInputStream();
            Bitmap myBitmap = BitmapFactory.decodeStream(input);
            return myBitmap;
        } catch (IOException e) {
            e.printStackTrace();
            return null;
        }
    }

    // Playing notification sound
    public void playNotificationSound() {
        try {
            Uri alarmSound = Uri.parse(ContentResolver.SCHEME_ANDROID_RESOURCE
                    + "://" + mContext.getPackageName() + "/raw/notification");
            Ringtone r = RingtoneManager.getRingtone(mContext, alarmSound);
            r.play();
        } catch (Exception e) {
            e.printStackTrace();
        }
    }

    /**
     * Method checks if the app is in background or not
     */
    public static boolean isAppIsInBackground(Context context) {
        boolean isInBackground = true;
        ActivityManager am = (ActivityManager) context.getSystemService(Context.ACTIVITY_SERVICE);
        if (Build.VERSION.SDK_INT > Build.VERSION_CODES.KITKAT_WATCH) {
            List<ActivityManager.RunningAppProcessInfo> runningProcesses = am.getRunningAppProcesses();
            for (ActivityManager.RunningAppProcessInfo processInfo : runningProcesses) {
                if (processInfo.importance == ActivityManager.RunningAppProcessInfo.IMPORTANCE_FOREGROUND) {
                    for (String activeProcess : processInfo.pkgList) {
                        if (activeProcess.equals(context.getPackageName())) {
                            isInBackground = false;
                        }
                    }
                }
            }
        } else {
            List<ActivityManager.RunningTaskInfo> taskInfo = am.getRunningTasks(1);
            ComponentName componentInfo = taskInfo.get(0).topActivity;
            if (componentInfo.getPackageName().equals(context.getPackageName())) {
                isInBackground = false;
            }
        }

        return isInBackground;
    }

    // Clears notification tray messages
    public static void clearNotifications(Context context) {
        NotificationManager notificationManager = (NotificationManager) context.getSystemService(Context.NOTIFICATION_SERVICE);
        notificationManager.cancelAll();
    }

    public static long getTimeMilliSec(String timeStamp) {
        SimpleDateFormat format = new SimpleDateFormat("yyyy-MM-dd HH:mm:ss");
        try {
            Date date = format.parse(timeStamp);
            return date.getTime();
        } catch (ParseException e) {
            e.printStackTrace();
        }
        return 0;
    }
}
- یک کلاس با نام MyFirebaseInstanceIDService.java زیر پکیج service ایجاد کنید. این کلاس آی دی ثبت نام فایربیس که برای هر برنامه منحصر به فرد است را دریافت میکند. این آی دی ثبت نام وقتی که می خواهید به یک دستگاه پیام ارسال کنید مورد نیاز است. شما میتوانید این توکن را به برنامهی سرور ارسال کنید تا بعداً به دسگاه اعلان ارسال کند.
متد onTokenRefresh وقتی که آی دی ثبت نام فایربیس تغییر میکند فراخوانی میشود.
متد storeRegIdInPref() آی دی ثبت نام را در shared preferences ذخیره میکند.
LocalBroadcastManager مدیریت کننده انتشار، reg id را برای تمام اکتیویتیهای گوش کننده منتشر میکند.
MyFirebaseInstanceIDService.java
package tik4.firebasenotifications.service;

import android.content.Intent;
import android.content.SharedPreferences;
import android.support.v4.content.LocalBroadcastManager;
import android.util.Log;

import com.google.firebase.iid.FirebaseInstanceId;
import com.google.firebase.iid.FirebaseInstanceIdService;

import tik4.firebasenotifications.app.Config;

/**
 * Created by tik4 on 08/08/16.
 * www.androidhive.info
 */
public class MyFirebaseInstanceIDService extends FirebaseInstanceIdService {
    private static final String TAG = MyFirebaseInstanceIDService.class.getSimpleName();

    @Override
    public void onTokenRefresh() {
        super.onTokenRefresh();
        String refreshedToken = FirebaseInstanceId.getInstance().getToken();

        // Saving reg id to shared preferences
        storeRegIdInPref(refreshedToken);

        // sending reg id to your server
        sendRegistrationToServer(refreshedToken);

        // Notify UI that registration has completed, so the progress indicator can be hidden.
        Intent registrationComplete = new Intent(Config.REGISTRATION_COMPLETE);
        registrationComplete.putExtra("token", refreshedToken);
        LocalBroadcastManager.getInstance(this).sendBroadcast(registrationComplete);
    }

    private void sendRegistrationToServer(final String token) {
        // sending gcm token to server
        Log.e(TAG, "sendRegistrationToServer: " + token);
    }

    private void storeRegIdInPref(String token) {
        SharedPreferences pref = getApplicationContext().getSharedPreferences(Config.SHARED_PREF, 0);
        SharedPreferences.Editor editor = pref.edit();
        editor.putString("regId", token);
        editor.commit();
    }
}
- کلاس دیگری با نام MyFirebaseMessagingService.java زیر پکیج service ایجاد کنید. این کلاس پیامهای فایربیس را با متد onMessageReceived() دریافت میکند.
>وقتی که پیام با نوع اعلان ارسال شد، وقتی که که برنامه در پس زمینه در حال اجرا است، فایربیس به طور خودکار اعلان را نمایش میدهد. اگر برنامه در پیش زمینه در حال اجرا باشد متد handleNotification() پیام اعلان را مدیریت میکند
>وقتی که پیام با نوع داده ارسال شد، متد handleDataMessage() برای مدیریت پیلود بدون در نظر گرفتن وضعیت برنامه(از نظر اجرا در پس زمینه یا پیش زمینه)
> LocalBroadcastManager برای انتشار پیام بین تمام اکتیویتیهایی که برای دریافت برودکست ثبت نام کردهاند.
MyFirebaseMessagingService.java
package tik4.firebasenotifications.service;

import android.content.Context;
import android.content.Intent;
import android.support.v4.content.LocalBroadcastManager;
import android.text.TextUtils;
import android.util.Log;

import com.google.firebase.messaging.FirebaseMessagingService;
import com.google.firebase.messaging.RemoteMessage;

import org.json.JSONException;
import org.json.JSONObject;

import tik4.firebasenotifications.activity.MainActivity;
import tik4.firebasenotifications.app.Config;
import tik4.firebasenotifications.util.NotificationUtils;

/**
 * Created by tik4 on 08/08/16.
 * www.androidhive.info
 */
public class MyFirebaseMessagingService extends FirebaseMessagingService {

    private static final String TAG = MyFirebaseMessagingService.class.getSimpleName();

    private NotificationUtils notificationUtils;

    @Override
    public void onMessageReceived(RemoteMessage remoteMessage) {
        Log.e(TAG, "From: " + remoteMessage.getFrom());

        if (remoteMessage == null)
            return;

        // Check if message contains a notification payload.
        if (remoteMessage.getNotification() != null) {
            Log.e(TAG, "Notification Body: " + remoteMessage.getNotification().getBody());
            handleNotification(remoteMessage.getNotification().getBody());
        }

        // Check if message contains a data payload.
        if (remoteMessage.getData().size() > 0) {
            Log.e(TAG, "Data Payload: " + remoteMessage.getData().toString());

            try {
                JSONObject json = new JSONObject(remoteMessage.getData().toString());
                handleDataMessage(json);
            } catch (Exception e) {
                Log.e(TAG, "Exception: " + e.getMessage());
            }
        }
    }

    private void handleNotification(String message) {
        if (!NotificationUtils.isAppIsInBackground(getApplicationContext())) {
            // app is in foreground, broadcast the push message
            Intent pushNotification = new Intent(Config.PUSH_NOTIFICATION);
            pushNotification.putExtra("message", message);
            LocalBroadcastManager.getInstance(this).sendBroadcast(pushNotification);

            // play notification sound
            NotificationUtils notificationUtils = new NotificationUtils(getApplicationContext());
            notificationUtils.playNotificationSound();
        }else{
            // If the app is in background, firebase itself handles the notification
        }
    }

    private void handleDataMessage(JSONObject json) {
        Log.e(TAG, "push json: " + json.toString());

        try {
            JSONObject data = json.getJSONObject("data");

            String title = data.getString("title");
            String message = data.getString("message");
            boolean isBackground = data.getBoolean("is_background");
            String imageUrl = data.getString("image");
            String timestamp = data.getString("timestamp");
            JSONObject payload = data.getJSONObject("payload");

            Log.e(TAG, "title: " + title);
            Log.e(TAG, "message: " + message);
            Log.e(TAG, "isBackground: " + isBackground);
            Log.e(TAG, "payload: " + payload.toString());
            Log.e(TAG, "imageUrl: " + imageUrl);
            Log.e(TAG, "timestamp: " + timestamp);


            if (!NotificationUtils.isAppIsInBackground(getApplicationContext())) {
                // app is in foreground, broadcast the push message
                Intent pushNotification = new Intent(Config.PUSH_NOTIFICATION);
                pushNotification.putExtra("message", message);
                LocalBroadcastManager.getInstance(this).sendBroadcast(pushNotification);

                // play notification sound
                NotificationUtils notificationUtils = new NotificationUtils(getApplicationContext());
                notificationUtils.playNotificationSound();
            } else {
                // app is in background, show the notification in notification tray
                Intent resultIntent = new Intent(getApplicationContext(), MainActivity.class);
                resultIntent.putExtra("message", message);

                // check for image attachment
                if (TextUtils.isEmpty(imageUrl)) {
                    showNotificationMessage(getApplicationContext(), title, message, timestamp, resultIntent);
                } else {
                    // image is present, show notification with image
                    showNotificationMessageWithBigImage(getApplicationContext(), title, message, timestamp, resultIntent, imageUrl);
                }
            }
        } catch (JSONException e) {
            Log.e(TAG, "Json Exception: " + e.getMessage());
        } catch (Exception e) {
            Log.e(TAG, "Exception: " + e.getMessage());
        }
    }

    /**
     * Showing notification with text only
     */
    private void showNotificationMessage(Context context, String title, String message, String timeStamp, Intent intent) {
        notificationUtils = new NotificationUtils(context);
        intent.setFlags(Intent.FLAG_ACTIVITY_NEW_TASK | Intent.FLAG_ACTIVITY_CLEAR_TASK);
        notificationUtils.showNotificationMessage(title, message, timeStamp, intent);
    }

    /**
     * Showing notification with text and image
     */
    private void showNotificationMessageWithBigImage(Context context, String title, String message, String timeStamp, Intent intent, String imageUrl) {
        notificationUtils = new NotificationUtils(context);
        intent.setFlags(Intent.FLAG_ACTIVITY_NEW_TASK | Intent.FLAG_ACTIVITY_CLEAR_TASK);
        notificationUtils.showNotificationMessage(title, message, timeStamp, intent, imageUrl);
    }
}
- AndroidManifest.xml را باز کنید و دو سرویس MyFirebaseMessagingService و MyFirebaseInstanceIDService فایربیس را اضافه کنید
AndroidManifest.xml
<?xml version="1.0" encoding="utf-8"?>
<manifest xmlns:android="http://schemas.android.com/apk/res/android"
    package="tik4.firebasenotifications">

    <application
        android:allowBackup="true"
        android:icon="@mipmap/ic_launcher"
        android:label="@string/app_name"
        android:supportsRtl="true"
        android:theme="@style/AppTheme">
        <activity
            android:name=".activity.MainActivity"
            android:label="@string/title_main_activity">
            <intent-filter>
                <action android:name="android.intent.action.MAIN" />

                <category android:name="android.intent.category.LAUNCHER" />
            </intent-filter>
        </activity>

        <!-- Firebase Notifications -->
        <service android:name=".service.MyFirebaseMessagingService">
            <intent-filter>
                <action android:name="com.google.firebase.MESSAGING_EVENT" />
            </intent-filter>
        </service>

        <service android:name=".service.MyFirebaseInstanceIDService">
            <intent-filter>
                <action android:name="com.google.firebase.INSTANCE_ID_EVENT" />
            </intent-filter>
        </service>
        <!-- ./Firebase Notifications -->
    </application>
</manifest>
- در نهایت ما نیاز داریم اکتیویتی اصلی را تغییر دهیم برای نمایش پیامهای که وارد میشوند در صفحه. فایل لایوت اکتیویتی اصلی activity_main.xml را باز کنید و لایوت را به صورت زیر تغیر دهید. با ادامه مقاله پوش نوتیفیکیشن اندروید با استفاده از FCM & PHP و سیستم پیامرسانی ابریگوگل همراه ما باشید.
activity_main.xml
<?xml version="1.0" encoding="utf-8"?>
<RelativeLayout xmlns:android="http://schemas.android.com/apk/res/android"
    xmlns:tools="http://schemas.android.com/tools"
    android:id="@+id/activity_main"
    android:layout_width="match_parent"
    android:layout_height="match_parent"
    android:paddingBottom="@dimen/activity_vertical_margin"
    android:paddingLeft="@dimen/activity_horizontal_margin"
    android:paddingRight="@dimen/activity_horizontal_margin"
    android:paddingTop="@dimen/activity_vertical_margin"
    tools:context="tik4.firebasenotifications.activity.MainActivity">

    <TextView
        android:id="@+id/txt_push_message"
        android:layout_width="wrap_content"
        android:layout_height="wrap_content"
        android:layout_alignParentTop="true"
        android:layout_centerHorizontal="true"
        android:layout_marginTop="40dp"
        android:gravity="center_horizontal"
        android:textColor="@color/colorPrimary"
        android:textSize="26dp" />

    <TextView
        android:id="@+id/txt_reg_id"
        android:layout_width="wrap_content"
        android:layout_height="wrap_content"
        android:layout_alignParentBottom="true" />
</RelativeLayout>
- فایل MainActivity.java را باز کنید و تغییرات ضروری زیر را در آن انجام دهید. اینجا در متد onResume() دریافت کنندهی برودکست را ثبت میکنیم. بنابراین این اکتیویتی پوش مسیج و آی دی ثبت نام را دریافت می کند.
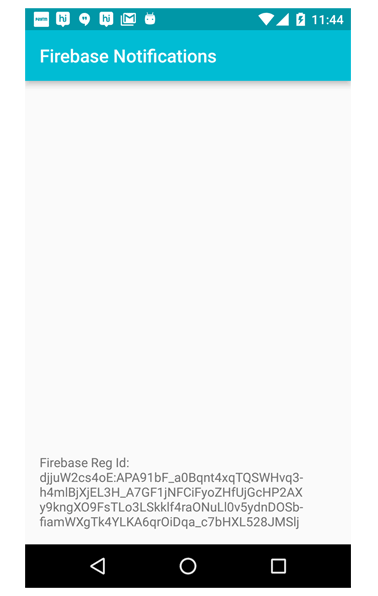
displayFirebaseRegId() آی دی ثبت نام فایربیس از (SharedPrefrences) واکشی میکند و آن را برروی صفحه نمایش نمایش میدهد. این فقط برای استفاده شما مطرح شد، ما در هیچ جای این برنامه از آی دی ثبت نام استفاده نمیکنیم.
مشترک شدن در یک موضوع
وقتی که میخواهید در یک موضوع مشترک شوید، تابعsubscribeToTopic() را میتوانید استفاده کنید. وقتی که برنامه ی مشتری به یک موضوع جدید مشترک می شود(موردی که تا کنون در پروژه ی فایربیس شما وجود نداشته است)، یک موضوع جدید با آن نام در fcm ایجاد شود و هر مشتری بعد از آن می تواند مشترک آن شود.
FirebaseMessaging.getInstance().subscribeToTopic('news');
خارج شدن از اشتراک یک موضوع
به طور مشابه، مشتری با صدا زدن متد unsubscribeFromTopic() میتواند از اشتراک یک موضوع خارج شود.
FirebaseMessaging.getInstance().unsubscribeFromTopic('news');
MainActivity.java
package tik4.firebasenotifications.activity;

import android.content.BroadcastReceiver;
import android.content.Context;
import android.content.Intent;
import android.content.IntentFilter;
import android.content.SharedPreferences;
import android.os.Bundle;
import android.support.v4.content.LocalBroadcastManager;
import android.support.v7.app.AppCompatActivity;
import android.text.TextUtils;
import android.util.Log;
import android.widget.TextView;
import android.widget.Toast;

import com.google.firebase.messaging.FirebaseMessaging;

import tik4.firebasenotifications.R;
import tik4.firebasenotifications.app.Config;
import tik4.firebasenotifications.util.NotificationUtils;

public class MainActivity extends AppCompatActivity {

    private static final String TAG = MainActivity.class.getSimpleName();
    private BroadcastReceiver mRegistrationBroadcastReceiver;
    private TextView txtRegId, txtMessage;

    @Override
    protected void onCreate(Bundle savedInstanceState) {
        super.onCreate(savedInstanceState);
        setContentView(R.layout.activity_main);

        txtRegId = (TextView) findViewById(R.id.txt_reg_id);
        txtMessage = (TextView) findViewById(R.id.txt_push_message);

        mRegistrationBroadcastReceiver = new BroadcastReceiver() {
            @Override
            public void onReceive(Context context, Intent intent) {

                // checking for type intent filter
                if (intent.getAction().equals(Config.REGISTRATION_COMPLETE)) {
                    // gcm successfully registered
                    // now subscribe to `global` topic to receive app wide notifications
                    FirebaseMessaging.getInstance().subscribeToTopic(Config.TOPIC_GLOBAL);

                    displayFirebaseRegId();

                } else if (intent.getAction().equals(Config.PUSH_NOTIFICATION)) {
                    // new push notification is received

                    String message = intent.getStringExtra("message");

                    Toast.makeText(getApplicationContext(), "Push notification: " + message, Toast.LENGTH_LONG).show();

                    txtMessage.setText(message);
                }
            }
        };

        displayFirebaseRegId();
    }

    // Fetches reg id from shared preferences
    // and displays on the screen
    private void displayFirebaseRegId() {
        SharedPreferences pref = getApplicationContext().getSharedPreferences(Config.SHARED_PREF, 0);
        String regId = pref.getString("regId", null);

        Log.e(TAG, "Firebase reg id: " + regId);

        if (!TextUtils.isEmpty(regId))
            txtRegId.setText("Firebase Reg Id: " + regId);
        else
            txtRegId.setText("Firebase Reg Id is not received yet!");
    }

    @Override
    protected void onResume() {
        super.onResume();

        // register GCM registration complete receiver
        LocalBroadcastManager.getInstance(this).registerReceiver(mRegistrationBroadcastReceiver,
                new IntentFilter(Config.REGISTRATION_COMPLETE));

        // register new push message receiver
        // by doing this, the activity will be notified each time a new message arrives
        LocalBroadcastManager.getInstance(this).registerReceiver(mRegistrationBroadcastReceiver,
                new IntentFilter(Config.PUSH_NOTIFICATION));

        // clear the notification area when the app is opened
        NotificationUtils.clearNotifications(getApplicationContext());
    }

    @Override
    protected void onPause() {
        LocalBroadcastManager.getInstance(this).unregisterReceiver(mRegistrationBroadcastReceiver);
        super.onPause();
    }
}
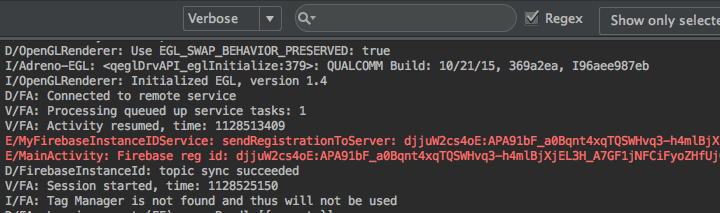
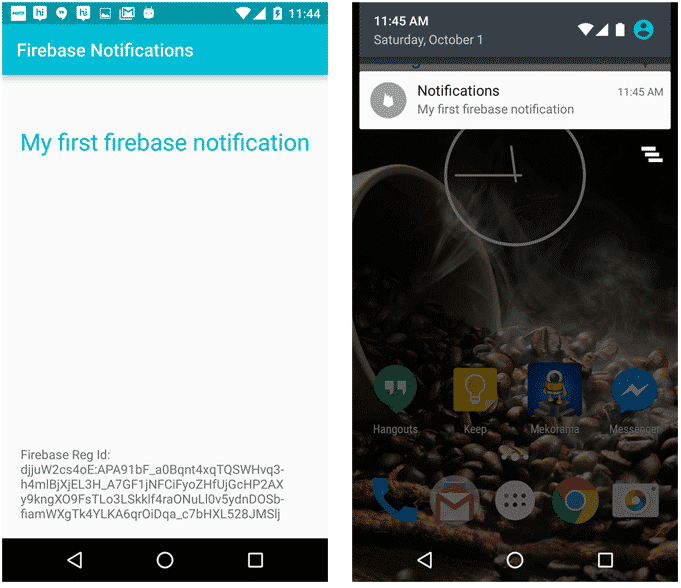
حالا ما یکپارچه سازی با پیامرسانی ابری فایربیس را کامل کردیم. برای بررسی(صحت) آن، پروژه را اجرا کنید. با اجرای برنامه باید آی دی ثبت نام فایربیس را در صفحه ببینید. و همچنین شما باید بتوانید آی دی ثبت نام را در logCat بیابید. با ادامه مقاله پوش نوتیفیکیشن اندروید با استفاده از FCM & PHP و سیستم پیامرسانی ابریگوگل همراه ما باشید.
-
ارسال پیام از کنسول فایربیس
حالا می خواهیم اولین پیام را از کنسول فایربیس ارسال کنیم. بروید به کنسول فایربیس و برروی Notifications در منوی سمت چپ کلیک کنید. یک رابط به شما ارائه خواهد شد که می توانید در آن پیام تایپ کنید targeting را انتخاب و پیام را ارسال کنید.
-
ارسال پیام از بک اند پی اچ پی
ارسال پیام از طریق کنسول فایربیس همیشه و برای بسیاری از برنامهها راه حل خوبی نیست. بسیاری از برنامهها نیاز به این دارند که در صورت رخداد یک رویداد خاص به صورت خودکار کاربر مطلع شود که با استفاده از کنسول فایربیس این کار ممکن نیست. برای غلبه بر این مشکل نیاز به یکپارچهسازی api ی فایربس با بک اند سرور شما وجود دارد.
بیاید با هم یک پروژهی سادهی پی اچ پی برای ارسال پیام از بک اند بسازیم. ما اینطور فرض میکنیم که شما دانش ابتدائیه کار با پی اچ پی و wamp را دارید. با ادامه مقاله پوش نوتیفیکیشن اندروید با استفاده از FCM & PHP و سیستم پیامرسانی ابریگوگل همراه ما باشید.
5.1 دریافت کلید ای پی آی از سرور فایربیس
فایربیس یک کلید سرور ای پی آی (Server api key) برای تشخیص برنامهی فایربیس شما ایجاد میکند. برای گرفتن این کلید به کنسول فایربیستان بروید، پروژه ی مربوطه را انتخاب کنید و به قسمت settings بروید، تب Cloud Messaging را انتخاب کنید و کلید سرور (Server key) را کپی کنید.
- به پوشهی وَمپ تان بروید و یک پوشهی جدید به نام firebase درون htdocs یا www درست کنید. اینجا ما کلید ایپیآی سرور فایربیس را برای ارسال درخواست به endpoint فایربیس تعریف میکنیم.
- یک فایل به نام config.php ایجاد کنید و کد زیر را به آن اضافه کنید. اینجا ما کلید سرور فایربیس را برای ارسال درخواست به اندپوینت فایربیس تعریف میکنیم.
config.php
<?php

// Firebase API Key
define('FIREBASE_API_KEY', 'AAAA4qJeE5A:APA91bGct--6lGrYwgBC8iz5reyx4qPUB7ByXX8MwC7Vcs8u...');
- یک فایل با نام push.php ایجاد کنید. این کلاس Json پوش نوتیفیکیشن که برای ارسال به فایربیس نیاز است را درست میکند.
push.php
<?php

/**
 * @tik4
 * @link URL Tutorial link
 */
class Push {

    // push message title
    private $title;
    private $message;
    private $image;
    // push message payload
    private $data;
    // flag indicating whether to show the push
    // notification or not
    // this flag will be useful when perform some opertation
    // in background when push is recevied
    private $is_background;

    function __construct() {

    }

    public function setTitle($title) {
        $this->title = $title;
    }

    public function setMessage($message) {
        $this->message = $message;
    }

    public function setImage($imageUrl) {
        $this->image = $imageUrl;
    }

    public function setPayload($data) {
        $this->data = $data;
    }

    public function setIsBackground($is_background) {
        $this->is_background = $is_background;
    }

    public function getPush() {
        $res = array();
        $res['data']['title'] = $this->title;
        $res['data']['is_background'] = $this->is_background;
        $res['data']['message'] = $this->message;
        $res['data']['image'] = $this->image;
        $res['data']['payload'] = $this->data;
        $res['data']['timestamp'] = date('Y-m-d G:i:s');
        return $res;
    }

}
- فایلی به نام firebase.php ایجاد کنید و کد زیر را به آن اضافه کنید. این کلاس شامل توابع مورد نیاز برای ارسال پیام به api فایربیس با ساختن یک درخواست CURL است.
<?php

/**
 * @tik4
 * @link URL Tutorial link
 */
class Firebase {

    // sending push message to single user by firebase reg id
    public function send($to, $message) {
        $fields = array(
            'to' => $to,
            'data' => $message,
        );
        return $this->sendPushNotification($fields);
    }

    // Sending message to a topic by topic name
    public function sendToTopic($to, $message) {
        $fields = array(
            'to' => '/topics/' . $to,
            'data' => $message,
        );
        return $this->sendPushNotification($fields);
    }

    // sending push message to multiple users by firebase registration ids
    public function sendMultiple($registration_ids, $message) {
        $fields = array(
            'to' => $registration_ids,
            'data' => $message,
        );

        return $this->sendPushNotification($fields);
    }

    // function makes curl request to firebase servers
    private function sendPushNotification($fields) {

        require_once __DIR__ . '/config.php';

        // Set POST variables
        $url = 'https://fcm.googleapis.com/fcm/send';

        $headers = array(
            'Authorization: key=' . FIREBASE_API_KEY,
            'Content-Type: application/json'
        );
        // Open connection
        $ch = curl_init();

        // Set the url, number of POST vars, POST data
        curl_setopt($ch, CURLOPT_URL, $url);

        curl_setopt($ch, CURLOPT_POST, true);
        curl_setopt($ch, CURLOPT_HTTPHEADER, $headers);
        curl_setopt($ch, CURLOPT_RETURNTRANSFER, true);

        // Disabling SSL Certificate support temporarly
        curl_setopt($ch, CURLOPT_SSL_VERIFYPEER, false);

        curl_setopt($ch, CURLOPT_POSTFIELDS, json_encode($fields));

        // Execute post
        $result = curl_exec($ch);
        if ($result === FALSE) {
            die('Curl failed: ' . curl_error($ch));
        }

        // Close connection
        curl_close($ch);

        return $result;
    }
}
?>
- در نهایت فایلی به نام index.php بسازید و کد زیر را به آن اضافه کنید. با این کار یک رابط کاربری ساده برای دریافت ورودی و ارسال اعلان به دستگاه اندروید ایجاد کردهاید.
index.php
<html>
    <head>
        <title>AndroidHive | Firebase Cloud Messaging</title>
        <meta charset="UTF-8">
        <meta name="viewport" content="width=device-width, initial-scale=1.0">
        <link rel="shortcut icon" href="//www.gstatic.com/mobilesdk/160503_mobilesdk/logo/favicon.ico">
        <link rel="stylesheet" href="http://yui.yahooapis.com/pure/0.6.0/pure-min.css">

        <style type="text/css">
            body{
            }
            div.container{
                width: 1000px;
                margin: 0 auto;
                position: relative;
            }
            legend{
                font-size: 30px;
                color: #555;
            }
            .btn_send{
                background: #00bcd4;
            }
            label{
                margin:10px 0px !important;
            }
            textarea{
                resize: none !important;
            }
            .fl_window{
                width: 400px;
                position: absolute;
                right: 0;
                top:100px;
            }
            pre, code {
                padding:10px 0px;
                box-sizing:border-box;
                -moz-box-sizing:border-box;
                webkit-box-sizing:border-box;
                display:block;
                white-space: pre-wrap;
                white-space: -moz-pre-wrap;
                white-space: -pre-wrap;
                white-space: -o-pre-wrap;
                word-wrap: break-word;
                width:100%; overflow-x:auto;
            }

        </style>
    </head>
    <body>
        <?php
        // Enabling error reporting
        error_reporting(-1);
        ini_set('display_errors', 'On');

        require_once __DIR__ . '/firebase.php';
        require_once __DIR__ . '/push.php';

        $firebase = new Firebase();
        $push = new Push();

        // optional payload
        $payload = array();
        $payload['team'] = 'India';
        $payload['score'] = '5.6';

        // notification title
        $title = isset($_GET['title']) ? $_GET['title'] : '';

        // notification message
        $message = isset($_GET['message']) ? $_GET['message'] : '';

        // push type - single user / topic
        $push_type = isset($_GET['push_type']) ? $_GET['push_type'] : '';

        // whether to include to image or not
        $include_image = isset($_GET['include_image']) ? TRUE : FALSE;


        $push->setTitle($title);
        $push->setMessage($message);
        if ($include_image) {
            $push->setImage('https://api.androidhive.info/images/minion.jpg');
        } else {
            $push->setImage('');
        }
        $push->setIsBackground(FALSE);
        $push->setPayload($payload);


        $json = '';
        $response = '';

        if ($push_type == 'topic') {
            $json = $push->getPush();
            $response = $firebase->sendToTopic('global', $json);
        } else if ($push_type == 'individual') {
            $json = $push->getPush();
            $regId = isset($_GET['regId']) ? $_GET['regId'] : '';
            $response = $firebase->send($regId, $json);
        }
        ?>
        <div class="container">
            <div class="fl_window">
                <div><img src="https://api.androidhive.info/images/firebase_logo.png" width="200" alt="Firebase"/></div>
                <br/>
                <?php if ($json != '') { ?>
                    <label><b>Request:</b></label>
                    <div class="json_preview">
                        <pre><?php echo json_encode($json) ?></pre>
                    </div>
                <?php } ?>
                <br/>
                <?php if ($response != '') { ?>
                    <label><b>Response:</b></label>
                    <div class="json_preview">
                        <pre><?php echo json_encode($response) ?></pre>
                    </div>
                <?php } ?>

            </div>

            <form class="pure-form pure-form-stacked" method="get">
                <fieldset>
                    <legend>Send to Single Device</legend>

                    <label for="redId">Firebase Reg Id</label>
                    <input type="text" id="redId" name="regId" class="pure-input-1-2" placeholder="Enter firebase registration id">

                    <label for="title">Title</label>
                    <input type="text" id="title" name="title" class="pure-input-1-2" placeholder="Enter title">

                    <label for="message">Message</label>
                    <textarea class="pure-input-1-2" rows="5" name="message" id="message" placeholder="Notification message!"></textarea>

                    <label for="include_image" class="pure-checkbox">
                        <input name="include_image" id="include_image" type="checkbox"> Include image
                    </label>
                    <input type="hidden" name="push_type" value="individual"/>
                    <button type="submit" class="pure-button pure-button-primary btn_send">Send</button>
                </fieldset>
            </form>
            <br/><br/><br/><br/>

            <form class="pure-form pure-form-stacked" method="get">
                <fieldset>
                    <legend>Send to Topic `global`</legend>

                    <label for="title1">Title</label>
                    <input type="text" id="title1" name="title" class="pure-input-1-2" placeholder="Enter title">

                    <label for="message1">Message</label>
                    <textarea class="pure-input-1-2" name="message" id="message1" rows="5" placeholder="Notification message!"></textarea>

                    <label for="include_image1" class="pure-checkbox">
                        <input id="include_image1" name="include_image" type="checkbox"> Include image
                    </label>
                    <input type="hidden" name="push_type" value="topic"/>
                    <button type="submit" class="pure-button pure-button-primary btn_send">Send to Topic</button>
                </fieldset>
            </form>
        </div>
    </body>
</html>
- از آدرس http://localhost/firebase به پروژه دسترسی دارید. (اگر آپاچی شما در یک پورت خاص حال اجرا باشد، با استفاده از شمارهی آن پورت خاص به پروژه دسترسی پیدا میکنید)
امیدواریم از مقاله پوش نوتیفیکیشن اندروید با استفاده از FCM & PHP و سیستم پیامرسانی ابریگوگل بهره کافی را برده باشید. از قسمت دیدگاه ها باما در ارتباط باشید.
دیدگاه خود را بیان کنید