
Google Cloud Messaging به شما اجازه این امکان را میدهد که پیامهای سبکی را از بکاند سرور به تمام دستگاهها بفرستید. Google Cloud Messaging باطری گوشی را به مقدار زیادی ذخیره میکند به این دلیل که برای داده های جدید نیازی به poll request به سرور نیست. با استفده از GCM شما قادر به ساخت برنامههای قدرتمند چندپلتفرمی (آی او اس، اندروید و وب) مثل چت لحظهای، خبرخوان، ذخیرهی ابری و… خواهید بود. یکی از امکان های خوب این روش این است که GCM کاملاً رایگان و نامحدود می باشد. از آنجا که parse.com اخیراً اعلام تعطیلی کرده است، GCM بهترین گزینه برای این کار است، حتی اگر چه رابط مدیریت نداشته باشد. اما جای نگرانی نیست، ما در این مقاله از سری مقالات تیک4 قصد داریم ساخت یک پنل مدیریتی ساده و ساخت اپلیکیشن فایربیس و PHP را آموزش می دهیم. باما همراه باشید.
به دلیل طولانی بودن مقاله ساخت اپلیکیشن چت با فایربیس، این مقاله را به سه قسمت تقسیم کردیم. هر قسمت ساخت یک قسمت خاص از برنامهی چت لحظهی را پوشش میدهد.
قسمت اول: ساخت api rest برای برنامهی چت که شامل برنامهی GCM سرور می شود را پوشش میدهد.
قسمت دوم: در مورد یکپارچه سازی GCM با برنامهی اندروید شامل پیام تست را توضیح میدهد.
قسمت سوم: ساخت برنامهی چت لحظهای ساده
پیامرسانی ابری گوگل(GCM)
به طور معمول پیاده سازی GCM شامل سه کامپوننت است. برای امکان صدا زدن GCM از برنامهی سرور میتوانید از پروتکل http یا XMPP استفاده کنید. HTTP فقط از پیامهای downstream پشتیبانی میکند. XMPP از هردوی downstream و upstream(دستگاه به gcm، و gcm به سرور) پشتیبانی میکند.
در زیر نمایش تصویری کل معماری را مشاهده می کنید. با ادامه مقاله ساخت اپلیکیشن چت با فایربیس با ما همراه باشید.
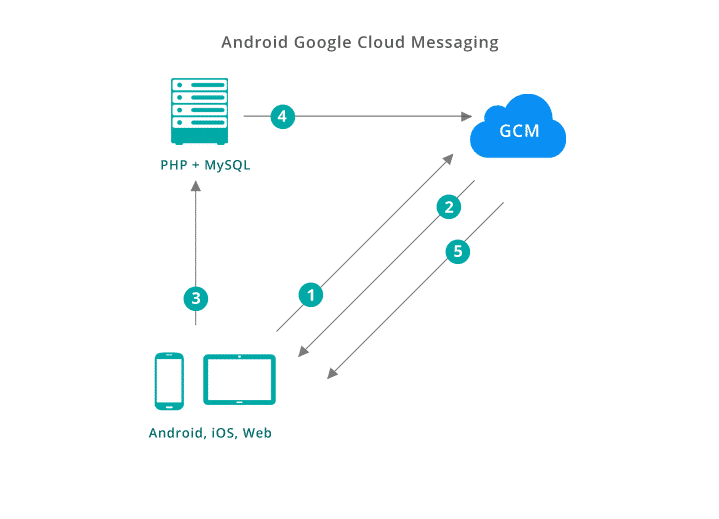
شرح معماری تصویر بالا:
- ابتدا برنامه به سرور GCM متصل و ثبت می شود.
- به محض ثبت نام موفق، GCM، gcm registration token برای دستگاه تولید میشود. این registration token هر دستگاه را به طور خاص مشخص میکند.
- سپس دستگاه registration token می فرستد به سرور تا MySQL ذخیره شود.
- هر زمان که برنامهی سرور بخواهد push notification ارسال کند، یک درخواست push message به همراه registration token به سرور GCM ارسال میکند.
- سرور GCM با registration token دستگاه را مشخص میکند و یک push message را میسازد.
- دستگاه push messages را دریافت کرده و اقدامات بعدی را انجام میدهد.
گرفتن Google API Key
برای تعامل با سرور GCM، Google API key ضروری است. GCM از این کلید برای تشخیص برنامهی سرور استفاده میکند. در زیر روش هایی را برای بدست آوردن API Key شرح می دهیم. توجه داشته باشید که رابط کنسول توسعه دهنده مدام تغییر میکند بنابراین ممکن است این روش ها در آینده تغییر کنند.
- ابتدا به developers consoleبروید و یک برنامهی جدید ایجاد کنید. اگر از قبل برنامهای دارید، همان را انتخاب نمایید.
- یک نام به پروژهی جدید خود اختصاص دهید. وقتی که پروژه ایجاد شد، به داشبورد پروژه بروید و برروی Use Google APIs کلیک کنید.
- زیر Mobile APIs ، برروی Cloud Messaging for Android کلیک نمایید و API را با کلیک بر روی enable API فعال کنید.
- وقتی که enable API فعال شد، بر روی Credentials که در سمت چپ صفحه است کلیک کنید. سپس درخواست ساخت credentials جدید را با نمایش چند گزینه بدهید. و در آخر API Key را انتخاب نمایید.
- بعد از انتخاب Server Key، API Key شما در داشبورد دیده خواهد شد. توجه داشت باشید به API Key از این جهت به آن نیاز داریم که در پروژهی php از آن استفاده کنیم.
ساخت یک برنامهی چت لحظهای ساده
در این مقاله، ما میخواهیم یاد بگیریم که چطور می شود یک برنامهی چت لحظهای ساده با استفاده از اندروید، GCM، PHP، MySQL، HTML & CSS بسازیم.که در این قسمت از HTML و CSS برای ساخت پنل ادمین برنامهی سرور استفاده میکنیم.
این قسمت از مقاله مستلزم ساخت برنامهی سرور شامل طراحی پایگاه دادهی MySQL و REST API برای برنامهی موبایل و یک پنل مدیریتی برای ارسال پوش نوتیفیکیشن است.
طراحی پایگاه داده MySQL
برای این برنامه ما نیاز به سه جدول داریم. کاربران، اتاق چت و پیامها.
کاربران: این جدول اطلاعات کاربران مثل نام، ایمیل و بقیهی اطلاعات حساب کاربری مرتبط با gcm registration id را نگه میدارد.
اتاق چت: شامل اطلاعات اتاق چت است.
پیامها: شامل پیامهای فرستاده شده در اتاق چت است.
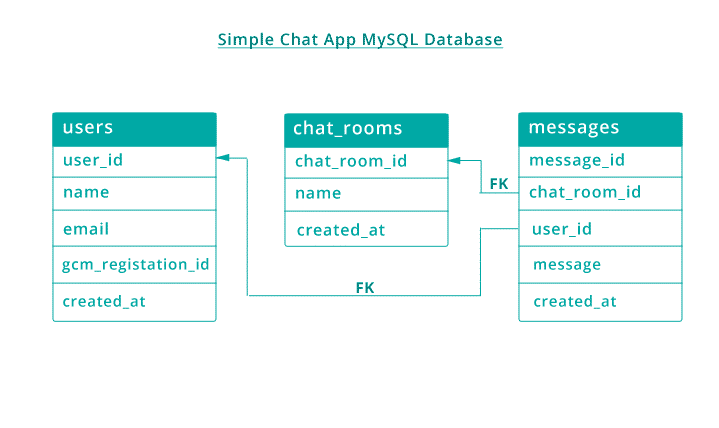
ابتدا Phpmyadmin را باز کنید و کد SQL زیر را برای ایجاد پایگاه داده و جداول مورد نیاز اجرا کنید.
CREATE DATABASE gcm_chat;

CREATE TABLE `chat_rooms` (
  `chat_room_id` int(11) NOT NULL,
  `name` varchar(100) NOT NULL,
  `created_at` timestamp NOT NULL DEFAULT CURRENT_TIMESTAMP
) ENGINE=InnoDB AUTO_INCREMENT=1 DEFAULT CHARSET=latin1;

CREATE TABLE `messages` (
  `message_id` int(11) NOT NULL,
  `chat_room_id` int(11) NOT NULL,
  `user_id` int(11) NOT NULL,
  `message` text NOT NULL,
  `created_at` timestamp NOT NULL DEFAULT CURRENT_TIMESTAMP
) ENGINE=InnoDB DEFAULT CHARSET=latin1;

CREATE TABLE `users` (
  `user_id` int(11) NOT NULL,
  `name` varchar(255) NOT NULL,
  `email` varchar(255) NOT NULL,
  `gcm_registration_id` text NOT NULL,
  `created_at` timestamp NOT NULL DEFAULT CURRENT_TIMESTAMP
) ENGINE=InnoDB DEFAULT CHARSET=latin1;

ALTER TABLE `chat_rooms`
  ADD PRIMARY KEY (`chat_room_id`);

ALTER TABLE `messages`
  ADD PRIMARY KEY (`message_id`),
  ADD KEY `chat_room_id` (`chat_room_id`),
  ADD KEY `user_id` (`user_id`),
  ADD KEY `chat_room_id_2` (`chat_room_id`);

ALTER TABLE `users`
  ADD PRIMARY KEY (`user_id`),
  ADD UNIQUE KEY `email` (`email`);

ALTER TABLE `messages`
  ADD CONSTRAINT `messages_ibfk_3` FOREIGN KEY (`chat_room_id`) REFERENCES `chat_rooms` (`chat_room_id`),
  ADD CONSTRAINT `messages_ibfk_2` FOREIGN KEY (`user_id`) REFERENCES `users` (`user_id`) ON DELETE CASCADE ON UPDATE CASCADE;
ساخت PHP REST API
برای ایجاد این بخش فریم ورک های متنوعی وجود دارد که ما ز فریمورک Slim را برای ایجاد REST endpoint ها پیشنهاد میکنیم. در عکس زیر ساختار پروژهی برنامهی PHP قرار دارد. شما برای اینکه بتوانید گامهای بعدی را بردارید باید مطمئن شوید که از همان ساختار پیروی میکنید. با ادامه مطلب آموزشی ساخت اپلیکیشن فایربیس و PHP همراه ما باشید.
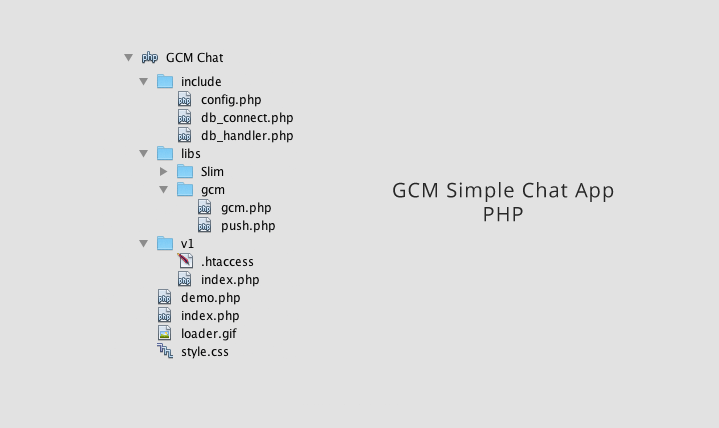
- Include: شامل کلاسهای پایگاه داده برای انجام عملیات
- CRUD :بر روی پایگاه داده است.
- Libs: شامل کتابخانههای مورد نیاز برای برنامه است(slim,gcm)
- v1: پوشهی ریشهی REST API
- Index.php,demo.php,styles.css : نیازمندیهای ساخت رابط مدیریت است
برای ساخت PHP REST API مرحله های زیر را انجام دهید:
- ابتدا به محل نصب WAMP/MAMP بروید و پوشهی فایل را باز کنید که در نظر داشته باشید پوشه web در ویندوز c:/wamp/www است و در مک مسیر /Applications/MAMP/htdocs است.
- درون پوشهی Web (www یا htdocs) یک پوشه به نام gcm_chat ایجاد کنید. این پوشهی ریشهی(root) پروژهی شما خواهد بود.
- درون پوشهی gcm_chat، بقیهی پوشههای نشان داده شده است . پوشههایی با نامهای include , libs و v1 ایجاد کنید و درون libs یک پوشهی دیگر به نام gcm ایجاد کنید.
- فریم ورک Slim را دانلود و در پوشهی libs قرار دهید.
- یک فایل به نام config.php درون پوشهی include ایجاد کنید. این فایل شامل پیکربندیهای برنامه مثل گواهینامه پایگاه داده، Api key گوگل و اطلاعات دیگر است.
حال برای ادامه پروژه GOOGLE_API_KEY را با کلید API خودتان که در قسمت دوم بدست آوردید، جابجا کنید. همچنین گواهینامهی درست پایگاه داده را نگه دارید.
config.php
<?php
/**
 * Database configuration
 */
define('DB_USERNAME', 'root');
define('DB_PASSWORD', 'root');
define('DB_HOST', 'localhost');
define('DB_NAME', 'gcm_chat');

define("GOOGLE_API_KEY", "AIzaSyDKk_Ew7Vi4FZnMzu6GCY5PLb4xZG8muvX");

// push notification flags
define('PUSH_FLAG_CHATROOM', 1);
define('PUSH_FLAG_USER', 2);

?>
- یک فایل به نام db_connect.php درون پوشهی include درست کنید. این کلاس مراقب اتصال پایگاه داده است.
db_connect.php
<?php

/**
 * Handling database connection
 *
 */
class DbConnect {

    private $conn;

    function __construct() {
    }

    /**
     * Establishing database connection
     * @return database connection handler
     */
    function connect() {
        include_once dirname(__FILE__) . '/config.php';

        // Connecting to mysql database
        $this->conn = new mysqli(DB_HOST, DB_USERNAME, DB_PASSWORD, DB_NAME);

        // Check for database connection error
        if (mysqli_connect_errno()) {
            echo "Failed to connect to MySQL: " . mysqli_connect_error();
        }

        // returing connection resource
        return $this->conn;
    }
}
?>
- یک فایل دیگر به نام db_handler.php درون پوشهی include درست کنید. این فایل شامل تمام توابع مورد نیاز برای تعامل با جداول پایگاه داده است.
db_handler.php
<?php

/**
 * Class to handle all db operations
 * This class will have CRUD methods for database tables
 *
 * @tik4
 */
class DbHandler {

    private $conn;

    function __construct() {
        require_once dirname(__FILE__) . '/db_connect.php';
        // opening db connection
        $db = new DbConnect();
        $this->conn = $db->connect();
    }

    // creating new user if not existed
    public function createUser($name, $email) {
        $response = array();

        // First check if user already existed in db
        if (!$this->isUserExists($email)) {
            // insert query
            $stmt = $this->conn->prepare("INSERT INTO users(name, email) values(?, ?)");
            $stmt->bind_param("ss", $name, $email);

            $result = $stmt->execute();

            $stmt->close();

            // Check for successful insertion
            if ($result) {
                // User successfully inserted
                $response["error"] = false;
                $response["user"] = $this->getUserByEmail($email);
            } else {
                // Failed to create user
                $response["error"] = true;
                $response["message"] = "Oops! An error occurred while registereing";
            }
        } else {
            // User with same email already existed in the db
            $response["error"] = false;
            $response["user"] = $this->getUserByEmail($email);
        }

        return $response;
    }

    // updating user GCM registration ID
    public function updateGcmID($user_id, $gcm_registration_id) {
        $response = array();
        $stmt = $this->conn->prepare("UPDATE users SET gcm_registration_id = ? WHERE user_id = ?");
        $stmt->bind_param("si", $gcm_registration_id, $user_id);

        if ($stmt->execute()) {
            // User successfully updated
            $response["error"] = false;
            $response["message"] = 'GCM registration ID updated successfully';
        } else {
            // Failed to update user
            $response["error"] = true;
            $response["message"] = "Failed to update GCM registration ID";
            $stmt->error;
        }
        $stmt->close();

        return $response;
    }

    // fetching single user by id
    public function getUser($user_id) {
        $stmt = $this->conn->prepare("SELECT user_id, name, email, gcm_registration_id, created_at FROM users WHERE user_id = ?");
        $stmt->bind_param("s", $user_id);
        if ($stmt->execute()) {
            // $user = $stmt->get_result()->fetch_assoc();
            $stmt->bind_result($user_id, $name, $email, $gcm_registration_id, $created_at);
            $stmt->fetch();
            $user = array();
            $user["user_id"] = $user_id;
            $user["name"] = $name;
            $user["email"] = $email;
            $user["gcm_registration_id"] = $gcm_registration_id;
            $user["created_at"] = $created_at;
            $stmt->close();
            return $user;
        } else {
            return NULL;
        }
    }

    // fetching multiple users by ids
    public function getUsers($user_ids) {

        $users = array();
        if (sizeof($user_ids) > 0) {
            $query = "SELECT user_id, name, email, gcm_registration_id, created_at FROM users WHERE user_id IN (";

            foreach ($user_ids as $user_id) {
                $query .= $user_id . ',';
            }

            $query = substr($query, 0, strlen($query) - 1);
            $query .= ')';

            $stmt = $this->conn->prepare($query);
            $stmt->execute();
            $result = $stmt->get_result();

            while ($user = $result->fetch_assoc()) {
                $tmp = array();
                $tmp["user_id"] = $user['user_id'];
                $tmp["name"] = $user['name'];
                $tmp["email"] = $user['email'];
                $tmp["gcm_registration_id"] = $user['gcm_registration_id'];
                $tmp["created_at"] = $user['created_at'];
                array_push($users, $tmp);
            }
        }

        return $users;
    }

    // messaging in a chat room / to persional message
    public function addMessage($user_id, $chat_room_id, $message) {
        $response = array();

        $stmt = $this->conn->prepare("INSERT INTO messages (chat_room_id, user_id, message) values(?, ?, ?)");
        $stmt->bind_param("iis", $chat_room_id, $user_id, $message);

        $result = $stmt->execute();

        if ($result) {
            $response['error'] = false;

            // get the message
            $message_id = $this->conn->insert_id;
            $stmt = $this->conn->prepare("SELECT message_id, user_id, chat_room_id, message, created_at FROM messages WHERE message_id = ?");
            $stmt->bind_param("i", $message_id);
            if ($stmt->execute()) {
                $stmt->bind_result($message_id, $user_id, $chat_room_id, $message, $created_at);
                $stmt->fetch();
                $tmp = array();
                $tmp['message_id'] = $message_id;
                $tmp['chat_room_id'] = $chat_room_id;
                $tmp['message'] = $message;
                $tmp['created_at'] = $created_at;
                $response['message'] = $tmp;
            }
        } else {
            $response['error'] = true;
            $response['message'] = 'Failed send message';
        }

        return $response;
    }

    // fetching all chat rooms
    public function getAllChatrooms() {
        $stmt = $this->conn->prepare("SELECT * FROM chat_rooms");
        $stmt->execute();
        $tasks = $stmt->get_result();
        $stmt->close();
        return $tasks;
    }

    // fetching single chat room by id
    function getChatRoom($chat_room_id) {
        $stmt = $this->conn->prepare("SELECT cr.chat_room_id, cr.name, cr.created_at as chat_room_created_at, u.name as username, c.* FROM chat_rooms cr LEFT JOIN messages c ON c.chat_room_id = cr.chat_room_id LEFT JOIN users u ON u.user_id = c.user_id WHERE cr.chat_room_id = ?");
        $stmt->bind_param("i", $chat_room_id);
        $stmt->execute();
        $tasks = $stmt->get_result();
        $stmt->close();
        return $tasks;
    }

    /**
     * Checking for duplicate user by email address
     * @param String $email email to check in db
     * @return boolean
     */
    private function isUserExists($email) {
        $stmt = $this->conn->prepare("SELECT user_id from users WHERE email = ?");
        $stmt->bind_param("s", $email);
        $stmt->execute();
        $stmt->store_result();
        $num_rows = $stmt->num_rows;
        $stmt->close();
        return $num_rows > 0;
    }

    /**
     * Fetching user by email
     * @param String $email User email id
     */
    public function getUserByEmail($email) {
        $stmt = $this->conn->prepare("SELECT user_id, name, email, created_at FROM users WHERE email = ?");
        $stmt->bind_param("s", $email);
        if ($stmt->execute()) {
            // $user = $stmt->get_result()->fetch_assoc();
            $stmt->bind_result($user_id, $name, $email, $created_at);
            $stmt->fetch();
            $user = array();
            $user["user_id"] = $user_id;
            $user["name"] = $name;
            $user["email"] = $email;
            $user["created_at"] = $created_at;
            $stmt->close();
            return $user;
        } else {
            return NULL;
        }
    }

}

?>
- حال باید فایلهای مورد نیاز برای GCM را ایجاد کنیم. یک فایل به نام gcm.php درون پوشهی libs ⇒ gcm درست کنید. این فایل شامل توابع ضروری برای تعامل با سرور GCM است. این توابع اساساً یک درخواست CURL به سرور GCM با ارسال پارامترهای مورد نیاز برای واکشی یک پوش نوتیفیکیشن ایجاد میکند.
Send(): تابعی که پوش نوتیفیکیشن به یک کاربر تنها ارسال میکند.
sendToTopic(): ارسال پوش نوتیفیکیشن به یک موضوع
sendToMultiple() : ارسال پوش نوتیفیکیشن به چند کاربر
gcm.php
<?php
class GCM {

    // constructor
    function __construct() {

    }

    // sending push message to single user by gcm registration id
    public function send($to, $message) {
        $fields = array(
            'to' => $to,
            'data' => $message,
        );
        return $this->sendPushNotification($fields);
    }

    // Sending message to a topic by topic id
    public function sendToTopic($to, $message) {
        $fields = array(
            'to' => '/topics/' . $to,
            'data' => $message,
        );
        return $this->sendPushNotification($fields);
    }

    // sending push message to multiple users by gcm registration ids
    public function sendMultiple($registration_ids, $message) {
        $fields = array(
            'registration_ids' => $registration_ids,
            'data' => $message,
        );

        return $this->sendPushNotification($fields);
    }

    // function makes curl request to gcm servers
    private function sendPushNotification($fields) {

        // include config
        include_once __DIR__ . '/../../include/config.php';

        // Set POST variables
        $url = 'https://gcm-http.googleapis.com/gcm/send';

        $headers = array(
            'Authorization: key=' . GOOGLE_API_KEY,
            'Content-Type: application/json'
        );
        // Open connection
        $ch = curl_init();

        // Set the url, number of POST vars, POST data
        curl_setopt($ch, CURLOPT_URL, $url);

        curl_setopt($ch, CURLOPT_POST, true);
        curl_setopt($ch, CURLOPT_HTTPHEADER, $headers);
        curl_setopt($ch, CURLOPT_RETURNTRANSFER, true);

        // Disabling SSL Certificate support temporarly
        curl_setopt($ch, CURLOPT_SSL_VERIFYPEER, false);

        curl_setopt($ch, CURLOPT_POSTFIELDS, json_encode($fields));

        // Execute post
        $result = curl_exec($ch);
        if ($result === FALSE) {
            die('Curl failed: ' . curl_error($ch));
        }

        // Close connection
        curl_close($ch);

        return $result;
    }

}

?>
- زیر libs ⇒ gcm یک فایل دیگر به نام push.php ایجاد کنید. این کلاس فرمت json مورد نیاز که به عنوان یک پوش نوتیفیکیشن به دستگاه ارسال میشود را آماده میکند. اگر میخواهید فیلد دیگری به جیسون اضافه کنید شما باید، آن را به این کلاس اضافه کنید.
push.php
<?php
/**
 * @tik4
 * @link URL Tutorial link
 */

class Push{
    // push message title
    private $title;

    // push message payload
    private $data;

    // flag indicating background task on push received
    private $is_background;

    // flag to indicate the type of notification
    private $flag;

    function __construct() {

    }

    public function setTitle($title){
        $this->title = $title;
    }

    public function setData($data){
        $this->data = $data;
    }

    public function setIsBackground($is_background){
        $this->is_background = $is_background;
    }

    public function setFlag($flag){
        $this->flag = $flag;
    }

    public function getPush(){
        $res = array();
        $res['title'] = $this->title;
        $res['is_background'] = $this->is_background;
        $res['flag'] = $this->flag;
        $res['data'] = $this->data;

        return $res;
    }
}
- در این مرحله ما تمام توابع ضروری را در اختیار داریم. حالا بیایید REST API endpoint های برای برنامهی اندروید را آماده سازی کنیم. یک فایل به نام .htaccess درون پوشهی v1 ایجاد کنید و قوانین زیر را به آن اضافه کنید.
.htaccess RewriteEngine
On RewriteCond %{REQUEST_FILENAME} !-f
RewriteRule ^(.*)$ %{ENV:BASE}index.php [QSA,L]
فایل index.php را درون پوشه v1 بسازید ، همه عملیات درخواست به api از طریق این فایل انجام می شود.
فایل index.php نیز به شرح زیر است
v1/index.php
<?php

error_reporting(-1);
ini_set('display_errors', 'On');

require_once '../include/db_handler.php';
require '.././libs/Slim/Slim.php';

\Slim\Slim::registerAutoloader();

$app = new \Slim\Slim();

// User login
$app->post('/user/login', function() use ($app) {
    // check for required params
    verifyRequiredParams(array('name', 'email'));

    // reading post params
    $name = $app->request->post('name');
    $email = $app->request->post('email');

    // validating email address
    validateEmail($email);

    $db = new DbHandler();
    $response = $db->createUser($name, $email);

    // echo json response
    echoRespnse(200, $response);
});


/* * *
 * Updating user
 *  we use this url to update user's gcm registration id
 */
$app->put('/user/:id', function($user_id) use ($app) {
    global $app;

    verifyRequiredParams(array('gcm_registration_id'));

    $gcm_registration_id = $app->request->put('gcm_registration_id');

    $db = new DbHandler();
    $response = $db->updateGcmID($user_id, $gcm_registration_id);

    echoRespnse(200, $response);
});

/* * *
 * fetching all chat rooms
 */
$app->get('/chat_rooms', function() {
    $response = array();
    $db = new DbHandler();

    // fetching all user tasks
    $result = $db->getAllChatrooms();

    $response["error"] = false;
    $response["chat_rooms"] = array();

    // pushing single chat room into array
    while ($chat_room = $result->fetch_assoc()) {
        $tmp = array();
        $tmp["chat_room_id"] = $chat_room["chat_room_id"];
        $tmp["name"] = $chat_room["name"];
        $tmp["created_at"] = $chat_room["created_at"];
        array_push($response["chat_rooms"], $tmp);
    }

    echoRespnse(200, $response);
});

/**
 * Messaging in a chat room
 * Will send push notification using Topic Messaging
 *  */
$app->post('/chat_rooms/:id/message', function($chat_room_id) {
    global $app;
    $db = new DbHandler();

    verifyRequiredParams(array('user_id', 'message'));

    $user_id = $app->request->post('user_id');
    $message = $app->request->post('message');

    $response = $db->addMessage($user_id, $chat_room_id, $message);

    if ($response['error'] == false) {
        require_once __DIR__ . '/../libs/gcm/gcm.php';
        require_once __DIR__ . '/../libs/gcm/push.php';
        $gcm = new GCM();
        $push = new Push();

        // get the user using userid
        $user = $db->getUser($user_id);

        $data = array();
        $data['user'] = $user;
        $data['message'] = $response['message'];
        $data['chat_room_id'] = $chat_room_id;

        $push->setTitle("Google Cloud Messaging");
        $push->setIsBackground(FALSE);
        $push->setFlag(PUSH_FLAG_CHATROOM);
        $push->setData($data);

        // echo json_encode($push->getPush());exit;

        // sending push message to a topic
        $gcm->sendToTopic('topic_' . $chat_room_id, $push->getPush());

        $response['user'] = $user;
        $response['error'] = false;
    }

    echoRespnse(200, $response);
});


/**
 * Sending push notification to a single user
 * We use user's gcm registration id to send the message
 * * */
$app->post('/users/:id/message', function($to_user_id) {
    global $app;
    $db = new DbHandler();

    verifyRequiredParams(array('message'));

    $from_user_id = $app->request->post('user_id');
    $message = $app->request->post('message');

    $response = $db->addMessage($from_user_id, $to_user_id, $message);

    if ($response['error'] == false) {
        require_once __DIR__ . '/../libs/gcm/gcm.php';
        require_once __DIR__ . '/../libs/gcm/push.php';
        $gcm = new GCM();
        $push = new Push();

        $user = $db->getUser($to_user_id);

        $data = array();
        $data['user'] = $user;
        $data['message'] = $response['message'];
        $data['image'] = '';

        $push->setTitle("Google Cloud Messaging");
        $push->setIsBackground(FALSE);
        $push->setFlag(PUSH_FLAG_USER);
        $push->setData($data);

        // sending push message to single user
        $gcm->send($user['gcm_registration_id'], $push->getPush());

        $response['user'] = $user;
        $response['error'] = false;
    }

    echoRespnse(200, $response);
});


/**
 * Sending push notification to multiple users
 * We use gcm registration ids to send notification message
 * At max you can send message to 1000 recipients
 * * */
$app->post('/users/message', function() use ($app) {

    $response = array();
    verifyRequiredParams(array('user_id', 'to', 'message'));

    require_once __DIR__ . '/../libs/gcm/gcm.php';
    require_once __DIR__ . '/../libs/gcm/push.php';

    $db = new DbHandler();

    $user_id = $app->request->post('user_id');
    $to_user_ids = array_filter(explode(',', $app->request->post('to')));
    $message = $app->request->post('message');

    $user = $db->getUser($user_id);
    $users = $db->getUsers($to_user_ids);

    $registration_ids = array();

    // preparing gcm registration ids array
    foreach ($users as $u) {
        array_push($registration_ids, $u['gcm_registration_id']);
    }

    // insert messages in db
    // send push to multiple users
    $gcm = new GCM();
    $push = new Push();

    // creating tmp message, skipping database insertion
    $msg = array();
    $msg['message'] = $message;
    $msg['message_id'] = '';
    $msg['chat_room_id'] = '';
    $msg['created_at'] = date('Y-m-d G:i:s');

    $data = array();
    $data['user'] = $user;
    $data['message'] = $msg;
    $data['image'] = '';

    $push->setTitle("Google Cloud Messaging");
    $push->setIsBackground(FALSE);
    $push->setFlag(PUSH_FLAG_USER);
    $push->setData($data);

    // sending push message to multiple users
    $gcm->sendMultiple($registration_ids, $push->getPush());

    $response['error'] = false;

    echoRespnse(200, $response);
});

$app->post('/users/send_to_all', function() use ($app) {

    $response = array();
    verifyRequiredParams(array('user_id', 'message'));

    require_once __DIR__ . '/../libs/gcm/gcm.php';
    require_once __DIR__ . '/../libs/gcm/push.php';

    $db = new DbHandler();

    $user_id = $app->request->post('user_id');
    $message = $app->request->post('message');

    require_once __DIR__ . '/../libs/gcm/gcm.php';
    require_once __DIR__ . '/../libs/gcm/push.php';
    $gcm = new GCM();
    $push = new Push();

    // get the user using userid
    $user = $db->getUser($user_id);

    // creating tmp message, skipping database insertion
    $msg = array();
    $msg['message'] = $message;
    $msg['message_id'] = '';
    $msg['chat_room_id'] = '';
    $msg['created_at'] = date('Y-m-d G:i:s');

    $data = array();
    $data['user'] = $user;
    $data['message'] = $msg;
    $data['image'] = 'https://www.tik4/wp-content/uploads/2016/01/Air-1.png';

    $push->setTitle("Google Cloud Messaging");
    $push->setIsBackground(FALSE);
    $push->setFlag(PUSH_FLAG_USER);
    $push->setData($data);

    // sending message to topic `global`
    // On the device every user should subscribe to `global` topic
    $gcm->sendToTopic('global', $push->getPush());

    $response['user'] = $user;
    $response['error'] = false;

    echoRespnse(200, $response);
});

/**
 * Fetching single chat room including all the chat messages
 *  */
$app->get('/chat_rooms/:id', function($chat_room_id) {
    global $app;
    $db = new DbHandler();

    $result = $db->getChatRoom($chat_room_id);

    $response["error"] = false;
    $response["messages"] = array();
    $response['chat_room'] = array();

    $i = 0;
    // looping through result and preparing tasks array
    while ($chat_room = $result->fetch_assoc()) {
        // adding chat room node
        if ($i == 0) {
            $tmp = array();
            $tmp["chat_room_id"] = $chat_room["chat_room_id"];
            $tmp["name"] = $chat_room["name"];
            $tmp["created_at"] = $chat_room["chat_room_created_at"];
            $response['chat_room'] = $tmp;
        }

        if ($chat_room['user_id'] != NULL) {
            // message node
            $cmt = array();
            $cmt["message"] = $chat_room["message"];
            $cmt["message_id"] = $chat_room["message_id"];
            $cmt["created_at"] = $chat_room["created_at"];

            // user node
            $user = array();
            $user['user_id'] = $chat_room['user_id'];
            $user['username'] = $chat_room['username'];
            $cmt['user'] = $user;

            array_push($response["messages"], $cmt);
        }
    }

    echoRespnse(200, $response);
});

/**
 * Verifying required params posted or not
 */
function verifyRequiredParams($required_fields) {
    $error = false;
    $error_fields = "";
    $request_params = array();
    $request_params = $_REQUEST;
    // Handling PUT request params
    if ($_SERVER['REQUEST_METHOD'] == 'PUT') {
        $app = \Slim\Slim::getInstance();
        parse_str($app->request()->getBody(), $request_params);
    }
    foreach ($required_fields as $field) {
        if (!isset($request_params[$field]) || strlen(trim($request_params[$field])) <= 0) {
            $error = true;
            $error_fields .= $field . ', ';
        }
    }

    if ($error) {
        // Required field(s) are missing or empty
        // echo error json and stop the app
        $response = array();
        $app = \Slim\Slim::getInstance();
        $response["error"] = true;
        $response["message"] = 'Required field(s) ' . substr($error_fields, 0, -2) . ' is missing or empty';
        echoRespnse(400, $response);
        $app->stop();
    }
}

/**
 * Validating email address
 */
function validateEmail($email) {
    $app = \Slim\Slim::getInstance();
    if (!filter_var($email, FILTER_VALIDATE_EMAIL)) {
        $response["error"] = true;
        $response["message"] = 'Email address is not valid';
        echoRespnse(400, $response);
        $app->stop();
    }
}

function IsNullOrEmptyString($str) {
    return (!isset($str) || trim($str) === '');
}

/**
 * Echoing json response to client
 * @param String $status_code Http response code
 * @param Int $response Json response
 */
function echoRespnse($status_code, $response) {
    $app = \Slim\Slim::getInstance();
    // Http response code
    $app->status($status_code);

    // setting response content type to json
    $app->contentType('application/json');

    echo json_encode($response);
}

$app->run();
?>
- تست REST API
قبل از شروع پروژهی اندروید، مطمئن شوید که پروژهی php بدون هر خطائی اجرا میشود. گامهای زیر را برای تست API دنبال کنید.
- ماژول mod_rewrite آپاچی را فعال کنید
- افزونهی curl را فعال کنید. این به پیاچپی اجازه میدهد که از سمت بکاند درخواست http بسازد.
- افزونهی کروم تست REST API پستمن POSTMAN را نصب کنید. میتوانید از مشتریهای دیگر rest api نیز استفاده کنید.
ساخت پنل مدیریت
ما یک پنل سادهی مدیریت با php، html، css و jQuery میسازیم. این پنل مدیریت ممکن است مناسب استفاده در مرحلهی بهربرداری (production) نباشد ولی توابع ضروری را برای بهتر شدن به شما میدهد. با مقاله ساخت اپلیکیشن فایربیس و PHP همراه ما باشید.
- یک فایل به نام demo.php در پوشهی ریشهی gcm_chat ایجاد کنید. این کلاس شامل توابعی برای پنل ادمین است.
demo.php
<?php

/**
 * Class to handle all db operations
 * This class will have CRUD methods for database tables
 *
 * @tik4
 */
class Demo {

    private $conn;

    function __construct() {
        require_once dirname(__FILE__) . '/include/db_connect.php';
        // opening db connection
        $db = new DbConnect();
        $this->conn = $db->connect();
    }

    public function getAllChatRooms() {
        $stmt = $this->conn->prepare("SELECT * FROM chat_rooms");
        $stmt->execute();
        $tasks = $stmt->get_result();
        $stmt->close();
        return $tasks;
    }

    public function getAllUsers() {
        $stmt = $this->conn->prepare("SELECT * FROM users");
        $stmt->execute();
        $tasks = $stmt->get_result();
        $stmt->close();
        return $tasks;
    }

    public function getDemoUser() {
        $name = 'AndroidHive';
        $email = 'admin@tik4';

        $stmt = $this->conn->prepare("SELECT user_id from users WHERE email = ?");
        $stmt->bind_param("s", $email);
        $stmt->execute();
        $stmt->store_result();
        $num_rows = $stmt->num_rows;
        if ($num_rows > 0) {
            $stmt->bind_result($user_id);
            $stmt->fetch();
            return $user_id;
        } else {
            $stmt = $this->conn->prepare("INSERT INTO users(name, email) values(?, ?)");
            $stmt->bind_param("ss", $name, $email);
            $result = $stmt->execute();
            $user_id = $stmt->insert_id;
            $stmt->close();
            return $user_id;
        }
    }
}
?>
- یک فایل style sheet به نام style.css در پوشهی ریشه ایجاد کنید.
style.css
/*
    Created on : 22 Jan, 2016, 10:12:06 PM
    Author     : tik4
*/

body{
    width: 100%;
    margin: 0;
    padding: 0;
    font-family: 'Raleway', sans-serif;
}
.container_body{
    width: 1000px;
    margin: 0 auto;
}
.header{
    padding: 100px 0;
    text-align: center;
    color: #fff;
    background: -moz-radial-gradient(center, ellipse cover, rgba(227,71,73,1) 0%, rgba(186,27,31,1) 100%); /* ff3.6+ */
    background: -webkit-gradient(radial, center center, 0px, center center, 100%, color-stop(0%, rgba(227,71,73,1)), color-stop(100%, rgba(186,27,31,1))); /* safari4+,chrome */
    background:-webkit-radial-gradient(center, ellipse cover, rgba(227,71,73,1) 0%, rgba(186,27,31,1) 100%); /* safari5.1+,chrome10+ */
    background: -o-radial-gradient(center, ellipse cover, rgba(227,71,73,1) 0%, rgba(186,27,31,1) 100%); /* opera 11.10+ */
    background: -ms-radial-gradient(center, ellipse cover, rgba(227,71,73,1) 0%, rgba(186,27,31,1) 100%); /* ie10+ */
    background:radial-gradient(ellipse at center, rgba(227,71,73,1) 0%, rgba(186,27,31,1) 100%); /* w3c */
    filter: progid:DXImageTransform.Microsoft.gradient( startColorstr='#e34749', endColorstr='#ba1b1f',GradientType=1 ); /* ie6-9 */
}
.header .logo{
    font-weight: bold;
    font-size: 30px;
    display: block;
    margin: 10px 0;
    letter-spacing: 3px;
}
.header h2{
    display: block;
    font-size: 50px;
    font-weight: 100;
    line-height: 10px;
}
.header h2.small{
    font-size: 25px;
    font-weight: 300;
    padding-top: 20px;
    letter-spacing: 1px;
}
.topics{
    text-align: center;
    padding-top: 50px;
}
.topics h2.heading{
    font-size: 30px;
    color: #666;
    font-weight: 400;
    display: block;
}
.box{
    width: 900px;
    margin: 40px auto;
    border: 1px solid #dedede;
    background: #f2f4f8;
    position: relative;
}
.box .usr_container,
.box .msg_container{
    float: left;
    height: 600px;
    overflow-x: hidden;
    overflow-y: auto;
}
.box .usr_container{
    width: 350px;
    border-right: 1px solid #dedede;
    background: #fff;
}
.box .msg_container{
    width: 548px;
    position: relative;
}
.box ul{
    margin: 0;
    padding: 0;
}
.box ul li{
    margin: 0;
    padding: 0;
    list-style: none;
    text-align: left;
    cursor: pointer;
}

.box .usr_container ul li{
    padding: 20px 10px;
    background: #fff;
    border-bottom: 1px solid #dedede;
}
.box .usr_container ul li label{
    display: block;
    width: 100%;
    font-family: arial;
    font-weight: 400;
    color: #333;
    font-size: 18px;
    margin-bottom: 5px;
}
.box .usr_container ul li label:hover{
    cursor: pointer;
}
.box .usr_container ul li span{
    color: #777;
    font-family: arial;
    font-size: 14px;
    font-style: italic;
}
.box .usr_container ul li.selected{
    background: #f2f4f8;
}
.box .usr_container ul li.selected label{
    color: #e34749;
}
.box .usr_container ul li.selected span{
    color: #000;
}
.box .usr_container ul li:hover{
    background: #dedede;
    cursor: pointer;
}
.box .msg_container ul{
    padding: 10px 0;
    margin-bottom: 75px;
}
.box .msg_container li{
    padding: 10px 0;
}
.box .msg_container li.others{
    cursor: auto;
    text-align: left;
    padding-left: 20px;
}
.box .msg_container li.self{
    text-align: right;
    cursor: auto;
    padding-right: 20px;
}
.box .msg_container li.self label{
    float: right;
}
.box .msg_container li .message{
    background: #fff;
    border-radius: 3px;
    padding: 15px;
    max-width: 400px;
    font-size: 15px;
    font-family: arial;
    float: left;
    line-height: 20px;
    margin: 5px 0 10px 0;
}
.box .msg_container li label{
    float: left;
    display: block;
    width: 100%;
    font-size: 12px;
    color: #777;
    font-family: arial;
}
.box .msg_container li.others .message{

}
.box .msg_container li.self .message{
    background: #dee2ef;
    float: right;
    display: inline-block;
}
.clear{
    clear:both;
}
.send_container{
    border-top: 1px solid #dedede;
    background: #f7f9fd;
    position: absolute;
    bottom: 0;
    height:75px;
    right: 0;
}
.send_container textarea{
    background: #f7f9fd;
    height: 30px;
    width: 550px;
    font-size: 15px;
    text-align: left;
    padding: 20px;
    border: none;
    resize: none;
    outline: none;
}
.send_container input[type="button"]{
    position: absolute;
    top: 20px;
    right: 20px;
    padding: 10px;
    background: #e34749;
    outline: none;
    border: none;
    cursor: pointer;
    color: #fff;
    font-weight: bold;
    font-size: 15px;
}
.btn_send{
    padding: 10px;
    background: #e34749;
    outline: none;
    border: none;
    cursor: pointer;
    color: #fff;
    font-weight: bold;
    font-size: 15px;
}
.box .msg_container li label.name{
    display: block;
}
div.container{
    width: 900px;
    margin: 0 auto;
}
select.select_single{
    padding: 10px;
    font-size: 16px;
    width: 400px;
}
select.select_single option{
    font-size: 19px;
}
select.select_multiple{
    font-size: 15px;
    width: 400px;
    height: 200px;
}
select.select_multiple option{
    padding: 5px;
}
textarea.textarea_msg{
    width: 400px;
    height: 120px;
    resize: none;
    margin:20px auto;
    padding: 15px;
    background: #f7f9fd;
    font-size: 15px;
}
.loader{
    display: none;
}
pre{
    width: 800px;
    text-align: left !important;
    font-size: 16px;
    font-family: monospace;
    margin: 0 auto;
    line-height: 20px;
}
.separator{
    width: 100%;
    height: 1px;
    background: #cdcdcd;
    margin: 50px 0;
}
- فایل عکس loader.gif را درون همان پوشه قرار دهید.
- فایل index.php را درون پوشهی ریشه ایجاد کنید. اینجا کدهای ضروری php، html و jQuery برای ساخت رابط مدیریتی را ذکر شده است.
index.php
<?php
error_reporting(-1);
ini_set('display_errors', 'On');
?>

<?php
require_once __DIR__ . '/demo.php';
$demo = new Demo();
$admin_id = $demo->getDemoUser();
?>

<html>
    <head>
        <title>Google Cloud Messaging 3.0 | AndroidHive</title>
        <meta charset="UTF-8">
        <meta name="viewport" content="width=device-width, initial-scale=1.0">
        <link href='https://fonts.googleapis.com/css?family=Raleway:400,800,100' rel='stylesheet' type='text/css'>
        <link href='style.css' rel='stylesheet' type='text/css'>
        <link href='https://api.tik4/gcm/styles/default.css' rel='stylesheet' type='text/css'>
        <script type="text/javascript" src="https://code.jquery.com/jquery-2.2.0.min.js"></script>
        <script type="text/javascript">
            var user_id = '<?= $admin_id ?>';
            $(document).ready(function () {

                getChatroomMessages($('#topics li:first').attr('id'));


                $('ul#topics li').on('click', function () {
                    $('ul#topics li').removeClass('selected');
                    $(this).addClass('selected');
                    getChatroomMessages($(this).prop('id'))
                });

                function getChatroomMessages(id) {
                    $.getJSON("v1/chat_rooms/" + id, function (data) {
                        var li = '';
                        $.each(data.messages, function (i, message) {
                            li += '<li class="others"><label class="name">' + message.user.username + '</label><div class="message">' + message.message + '</div><div class="clear"></div></li>';
                        });
                        $('ul#topic_messages').html(li);
                        if (data.messages.length > 0) {
                            scrollToBottom('msg_container_topic');
                        }
                    }).done(function () {

                    }).fail(function () {
                        alert('Sorry! Unable to fetch topic messages');
                    }).always(function () {

                    });

                    // attaching the chatroom id to send button
                    $('#send_to_topic').attr('chat_room', id);
                }

                $('#send_to_topic').on('click', function () {
                    var msg = $('#send_to_topic_message').val();
                    if (msg.trim().length === 0) {
                        alert('Enter a message');
                        return;
                    }

                    $('#send_to_topic_message').val('');
                    $('#loader_topic').show();

                    $.post("v1/chat_rooms/" + $(this).attr('chat_room') + '/message',
                            {user_id: user_id, message: msg},
                    function (data) {
                        if (data.error === false) {
                            var li = '<li class="self" tabindex="1"><label class="name">' + data.user.name + '</label><div class="message">' + data.message.message + '</div><div class="clear"></div></li>';
                            $('ul#topic_messages').append(li);
                            scrollToBottom('msg_container_topic');
                        } else {
                            alert('Sorry! Unable to send message');
                        }
                    }).done(function () {

                    }).fail(function () {
                        alert('Sorry! Unable to send message');
                    }).always(function () {
                        $('#loader_topic').hide();
                    });
                });

                $('input#send_to_single_user').on('click', function () {
                    var msg = $('#send_to_single').val();
                    var to = $('.select_single').val();
                    if (msg.trim().length === 0) {
                        alert('Enter a message');
                        return;
                    }

                    $('#send_to_single').val('');
                    $('#loader_single').show();

                    $.post("v1/users/" + to + '/message',
                            {user_id: user_id, message: msg},
                    function (data) {
                        if (data.error === false) {
                            $('#loader_single').hide();
                            alert('Push notification sent successfully! You should see a Toast message on device.');
                        } else {
                            alert('Sorry! Unable to post message');
                        }
                    }).done(function () {

                    }).fail(function () {
                        alert('Sorry! Unable to send message');
                    }).always(function () {
                        $('#loader_single').hide();
                    });
                });

                $('input#send_to_multiple_users').on('click', function () {
                    var msg = $('#send_to_multiple').val();
                    var to = $('.select_multiple').val();

                    if (to === null) {
                        alert("Please select the users!");
                        return;
                    }

                    if (msg.trim().length === 0) {
                        alert('Enter a message');
                        return;
                    }

                    $('#send_to_multiple').val('');
                    $('#loader_multiple').show();

                    var selMulti = $.map($(".select_multiple option:selected"), function (el, i) {
                        return $(el).val();
                    });

                    to = selMulti.join(",");

                    $.post("v1/users/message",
                            {user_id: user_id, to: to, message: msg},
                    function (data) {
                        if (data.error === false) {
                            $('#loader_multiple').hide();
                            alert('Push notification sent successfully to multiple users');
                        } else {
                            alert('Sorry! Unable to send message');
                        }
                    }).done(function () {

                    }).fail(function () {
                        alert('Sorry! Unable to send message');
                    }).always(function () {
                        $('#loader_multiple').hide();
                    });
                });

                $('input#send_to_multiple_users_with_image').on('click', function () {

                    var msg = $('#send_to_multiple_with_image').val();
                    if (msg.trim().length === 0) {
                        alert('Enter a message');
                        return;
                    }

                    $('#send_to_multiple_with_image').val('');
                    $('#loader_multiple_with_image').show();

                    $.post("v1/users/send_to_all",
                            {user_id: user_id, message: msg},
                    function (data) {
                        if (data.error === false) {
                            $('#loader_multiple_with_image').hide();
                            alert('Push notification sent successfully to multiple users');
                        } else {
                            alert('Sorry! Unable to send message');
                        }
                    }).done(function () {

                    }).fail(function () {
                        alert('Sorry! Unable to send message');
                    }).always(function () {
                        $('#loader_topic_with_image').hide();
                    });
                });

                function scrollToBottom(cls) {
                    $('.' + cls).scrollTop($('.' + cls + ' ul li').last().position().top + $('.' + cls + ' ul li').last().height());
                }
            });
        </script>
    </head>
    <body>
        <div class="header">
            <label class="logo">ANDROIDHIVE</label>
            <h2>Google Cloud Messaging</h2>
            <h2 class="small">Sending push notifications using Android, PHP & MySQL</h2>
        </div>
        <div class="container_body">
            <div class="topics">
                <h2 class="heading">Download & Install the GCM apk</h2>
                Download & Install the Google Cloud Messaging <a href="#">apk</a> before trying the demos. <br/><br/>Once installed, refresh this page
                to see your name, email in the recipients list.
            </div>

            <div class="topics">
                <div class="separator"></div>
                <h2 class="heading">Sending message to a `topic`</h2>
                Select any of the topics below and send a message.<br/><br/>
                <div class="box">
                    <div class="usr_container">
                        <ul id="topics">
                            <?php
                            $chatrooms = $demo->getAllChatRooms();
                            foreach ($chatrooms as $key => $chatroom) {
                                $cls = $key == 0 ? 'selected' : '';
                                ?>
                                <li id="<?= $chatroom['chat_room_id'] ?>" class="<?= $cls ?>">
                                    <label><?= $chatroom['name'] ?></label>
                                    <span>topic_<?= $chatroom['chat_room_id'] ?></span>
                                </li>
                                <?php
                            }
                            ?>
                        </ul>
                    </div>
                    <div class="msg_container msg_container_topic">
                        <ul id="topic_messages"></ul>
                    </div>
                    <div class="send_container">
                        <textarea placeholder="Type a message here" id="send_to_topic_message"></textarea>
                        <input id="send_to_topic" type="button" value="Send to Topic"/>
                        <img src="loader.gif" id="loader_topic" class="loader"/>
                    </div>
                    <div class="clear"></div>
                </div>
                <br/>
                <div class="separator"></div>
                <h2 class="heading">Sending message to `Single User`</h2>
                Select your name from the below recipients and send a message<br/><br/>

                <div class="container">
                    <select class="select_single">
                        <?php
                        $users = $demo->getAllUsers();
                        foreach ($users as $key => $user) {
                            ?>
                            <option value="<?= $user['user_id'] ?>"><?= $user['name'] ?> (<?= $user['email'] ?>)</option>
                            <?php
                        }
                        ?>
                    </select><br/>
                    <textarea id="send_to_single" class="textarea_msg" placeholder="Type a message"></textarea><br/>
                    <input id="send_to_single_user" type="button" value="Send to single user" class="btn_send"/>
                    <img src="loader.gif" id="loader_single" class="loader"/>
                </div>
                <br/>
                <div class="separator"></div>
                <h2 class="heading">Sending message to `Multiple Users`</h2>
                Select multiple recipients and send a message. You can use ctrl or shift to select multiple users<br/><br/><br/>

                <div class="container">
                    <select multiple class="select_multiple">
                        <?php
                        foreach ($users as $key => $user) {
                            ?>
                            <option value="<?= $user['user_id'] ?>"><?= $user['name'] ?> (<?= $user['email'] ?>)</option>
                            <?php
                        }
                        ?>
                    </select>
                    <br/>
                    <textarea id="send_to_multiple" class="textarea_msg" placeholder="Type a message"></textarea><br/>
                    <input id="send_to_multiple_users" type="button" value="Send to multiple users" class="btn_send"/>
                    <img src="loader.gif" id="loader_multiple" class="loader"/>
                </div>

                <br/>
                <div class="separator"></div>
                <h2 class="heading">Sending push notification with an `Image`</h2>
                A message with an image attachment will be sent to every user. You have to minimize or close the app in order to see
                it in action.<br/><br/>

                <div class="container">
                    <textarea id="send_to_multiple_with_image" class="textarea_msg" placeholder="Type a message"></textarea><br/>
                    <input id="send_to_multiple_users_with_image" type="button" value="Send with image" class="btn_send"/>
                    <img src="loader.gif" id="loader_multiple_with_image" class="loader"/>
                </div>
            </div>
            <br/><br/>
            <br/><br/>
            <br/><br/>
        </div>
    </body>
</html>
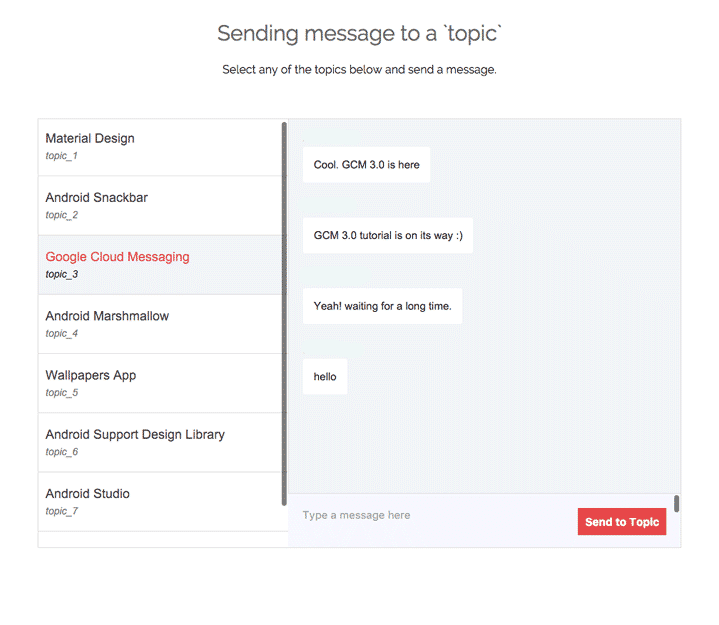
- در نهایت با رفتن به http://localhost/gcm_chat/ به پنل مدیریت دسترسی پیدا کنید. (اگر آپاچی شما زیر پروتکل خاصّی اجرا میشود، شمارهی پورت را به انتهای localhost اضافه کنید)
شما باید بتوانید پنل مدیریتی زیر را که امکاناتی برای ارسال پیام به دستگاهها از طریق پنل مدیریتی فراهم کرده است را ببینید. اینجا دموی زنده از برنامهی ادمین قرار دارد.
قسمت اول مقاله به پایان رسید، اما پیش از اتمام قسمت اول یک سری قطعه کد در اتمام مطلب ساخت اپلیکیشن چت با فایربیس به شما ارائه میکنیم.
قطعه کدهای سریع
ارسال پوش به تک کاربر
require_once __DIR__ . '/../libs/gcm/gcm.php';
require_once __DIR__ . '/../libs/gcm/push.php';
$gcm = new GCM();
$push = new Push();

$data = array();
// user node
$data['user'] = $user;
// message node
$data['message'] = $response['message'];
$data['image'] = '';

$push->setTitle("Google Cloud Messaging");
$push->setIsBackground(FALSE);
$push->setFlag(PUSH_FLAG_USER);
$push->setData($data);

// Pass the receiver gcm registration token
$gcm_registration_id = 'fnFAQ_BA7pY:APA91bFOwrCw9LHhJKatfvMx-2XA7-NdUMUMF5c9RS0....';

// sending push message to single user
$gcm->send($user['gcm_registration_id'], $push->getPush());
ارسال پوش به چند کاربر
require_once __DIR__ . '/../libs/gcm/gcm.php';
require_once __DIR__ . '/../libs/gcm/push.php';

$gcm = new GCM();
$push = new Push();

$msg = array();
$msg['message'] = $message;
$msg['message_id'] = '';
$msg['chat_room_id'] = '';
$msg['created_at'] = date('Y-m-d G:i:s');

$data = array();
$data['user'] = $user;
$data['message'] = $msg;
$data['image'] = '';

$push->setTitle("Google Cloud Messaging");
$push->setIsBackground(FALSE);
$push->setFlag(PUSH_FLAG_USER);
$push->setData($data);

// Keep all the recipients gcm tokens in an array
$registration_ids = array('fnFAQ_BA7pY:APA91bFOwrCw9LHhJKatfvMx-2XA7-NdUMUMF5c9RS0....', 'fnFAQ_BA7pY:APA91bFOwrCw9LHhJKatfvMx-2XA7-NdUMUMF5c9RS0....');

// sending push message to multiple users
$gcm->sendMultiple($registration_ids, $push->getPush());
ارسال پوش به موضوع
require_once __DIR__ . '/../libs/gcm/gcm.php';
require_once __DIR__ . '/../libs/gcm/push.php';

$gcm = new GCM();
$push = new Push();

$data = array();
$data['user'] = $user;
$data['message'] = $response['message'];
$data['chat_room_id'] = $chat_room_id;

$push->setTitle("Google Cloud Messaging");
$push->setIsBackground(FALSE);
$push->setFlag(PUSH_FLAG_CHATROOM);
$push->setData($data);

// the topic you want to send notification
$topic = 'your_topic_name';

// sending push message to a topic
$gcm->sendToTopic($topic, $push->getPush());
ارسال پوش با یک تصویر
require_once __DIR__ . '/../libs/gcm/gcm.php';
require_once __DIR__ . '/../libs/gcm/push.php';

$gcm = new GCM();
$push = new Push();

// keep the notification image url here
$image = 'https://api.tik4/gcm/panda.jpg';

$data = array();
$data['user'] = $user;
$data['message'] = $response['message'];
$data['image'] = $image;

$push->setTitle("Google Cloud Messaging");
$push->setIsBackground(FALSE);
$push->setFlag(PUSH_FLAG_USER);
$push->setData($data);

$gcm_registration_id = 'fnFAQ_BA7pY:APA91bFOwrCw9LHhJKatfvMx-2XA7-NdUMUMF5c9RS0....';

// sending push message to single user
$gcm->send($user['gcm_registration_id'], $push->getPush());
امیدواریم از مقاله ساخت اپلیکیشن فایربیس و PHP بهره کافی را برده باشید. امیدواریم در ادامه با مطالب ساخت اپلیکیشن چت با فایربیس همراه ما باشید.
/ ۵
رای ثبت شده
امتیاز خود را ثبت کنید...