
مدیریت و ارسال Push Notifications به وسیله Firebase و PHP
گوگل در چند وقت اخیر سامانه Google Cloud Messaging یا (GCM) را کنار گذاشته و سامانه Fire Base Cloud Messaging یا (FCM)را روی کار آورده است. FCM مانند GSM یک روش پیامرسانی برای cross platform است که به شما امکان ارسال پیام را میدهد. FCM کاملا رایگان است و هیچ محدودیتی برای استفاده کاربر ندارد. اگر شما آموزش های قبلی من در مورد gcm را دیده اید، به شما اکیدا توصیه میکنم که تمام فعالیت های خودتان را همین امروز به فایربیس منتقل کنید. قرار است که در این مقاله از سری مقالات تیک4 ویژگی های پیام رسان ابری فایربیس (firebase cloud messaging)را به وسیله ساختن یک برنامه ساده به شما آموزش بدهیم. همچنین یاد میگیرید که چگونه firebase را با backend خود ادغام کنید، تا بتوانید از سرور خود پیام ارسال کنید. با مقاله آموزش فایربیس و آموزش Push Notifications به وسیله فایربیس باما همراه باشید.

1.انواع پیامها در firebase
با استفاده از پیام رسان ابری فایربیس میتوانید سه نوع پیام ارسال کنید که شامل:
- پیام همراه با اعلان (Notification message)
- داده پیام (Data message)
- پیامی ترکیبی از این دو یعنی با اعلان و محتوای حاوی داده ( both Notification & Data Payload) میباشد.
1.1 پیام به صورت اعلان(notification message)
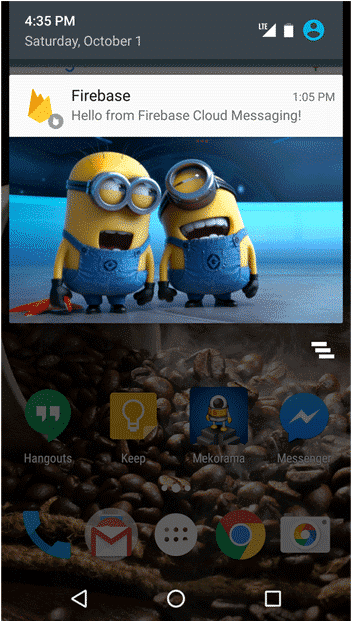
بخش پیامهای به صورت پبام همراه با اعلان (notification messages) به وسیله firebase SDK پردازش میشود. پیام اعلان ها شامل مواردی همچون عنوان، پیام، آیکون و … میشود. این پیامها را میتوان با رابط کاربری میزکار (firebase console) به فایربیس ارسال کرد. درصورتی که از این نوع پیامها ارسال کنید، زیاد بر اعلانهای پیامتان کنترلی نخواهید داشت. اعلان وقتی نمایش داده خواهد شد که نرم افزار مربوطه در حال اجرا باشد.
برای فرستادن پیام اعلان باید از کلید notification در داده json استفاده کنید. یک مثال برای پیام اعلان را در بخش زیر مشاهده میکنید.
{
    "to": "e1w6hEbZn-8:APA91bEUIb2JewYCIiApsMu5JfI5Ak...",
    "notification": {
        "body": "Cool offers. Get them before expiring!",
        "title": "Flat 80% discount",
        "icon": "appicon"
    }
}
1.2 داده پیامها (data messages)
داده پیامها باید به وسیله برنامه اندرویدی مربوطه پردازش شوند. در صورتی که بخواهید اطلاعات بیشتری همراه با پیام اعلان برای کاربر بفرستید میتوانید از این نوع پیامها استفاده کرده و آنها را اضافه کنید. اما نمیتوانید از میزکار فایربیس برای فرستادن این نوع پیام ها استفاده کنید. شما برای ارسال notification به وسیله firebase API به یک server-side logic احتیاج دارید. شما باید از کلید data هنگام ارسال این (نوع) پیام استفاده کنید.
یک نمونه از json مربوط به داده پیام در بخش زیر مشاهده میکنید.
{
   "to" : "e1w6hEbZn-8:APA91bEUIb2JewYCIiApsMu5JfI5Ak...",
   "data" : {
     "name" : "LG LED TV S15",
     "product_id" : "123",
     "final_price" : "2500"
   }
 }
1.3 پیام همراه با اعلان و محتوای حاوی داده (messages with both notification and data payload)
یک پیام میتواند شامل هردوی، اعلان و محتوای حاوی داده باشد. وقتی این نوع پیامها ارسال میشوند، با توجه به اینکه برنامه در چه حالتی اجرا میشود، به دو روش پردازش میشوند (پسزمینه background / پیشزمینه foreground). برای این نوع پیامها میتوان از هر دو کلید data و notification استفاده کرد.
در صورتی که نرمافزار مربوط در background باشند:
برنامهها محتوای اعلان را در notification tray دریافت میکنند، و فقط محتوای حاوی داده را پردازش میکنند.
در صورتی که نرمافزار مربوط در foreground باشند:
نرمافزار یک فایل پیام که شامل هر دو محتوا است را دریافت میکند.
در بخش زیر مثالی از یک پیام ترکیبی از اعلان و محتوای داده را میبینیم. با مقاله آموزش فایربیس و آموزش Push Notifications به وسیله فایربیس باما همراه باشید.
{
    "to" : "e1w6hEbZn-8:APA91bEUIb2JewYCIiApsMu5JfI5Ak...",
    "notification": {
        "body": "Cool offers. Get them before expiring!",
        "title": "Flat 80% discount",
        "icon": "appicon"
    },
    "data" : {
     "name" : "LG LED TV S15",
     "product_id" : "123",
     "final_price" : "2500"
   }
}
2. دریافتکنندههای پیام
هنگامی که به وسیله firebase پیامی ارسال میکنید، میتوانید افرادی که پیام را دریافت میکنند انتخاب کنید. شما میتوانید به یک کاربر یا گروهی از کاربران با استفاده از topic name پیام بدهید
2.1 ارسال برای یک کاربر
وقتی یک کاربر انتخاب شد، شناسه ثبتنامی فایربیس (firebase registration id) برای شناسایی دستگاه مورد استفاده قرار میگیرد.
باید به شناسه ثبتنامی (reg id) در بخش to در json اشاره شود. (شناسه ثبتنامی در json در بخش to وارد شود)
{
  "to": "e1w6hEbZn-8:APA91bEUIb2JewYCIiApsMu5JfI5Ak...",
  "data": {
    "message": "This is a Firebase Cloud Messaging Topic Message!",
   }
}
2.2 ارسال پیام به صورت موضوعی (topic messaging)
ارسال پیام موضوعی در صورتی که بخشی از کاربران کاربر هدف پیامهای ما باشند بسیار مفید خواهد بود. به همین منظور تمام کاربران باید در firebase topic ثبتنام کنند.
برای مثال: هنگامی که بخواهید به تمام کاربرانی که با اخبار در ارتباط هستند پیامی ارسال کنید، میتوانید یک topic با نام ((اخبار)) بسازید و اعلانهای خود را به آن topic بفرستید.
قالب که برای درخواست فرستادن topic message باید استفاده شود را در بخش پایین مشاهده میکنید. در بخش to شما باید به topic name اشاره کنید(topic name را در بخش to وارد کنید)
{
  "to": "/topics/news",
  "data": {
    "message": "This is a Firebase Cloud Messaging Topic Message!",
   }
}
3. یکپارچهسازی سامانه پیامرسانی ابری firebase
امیدواریم اطلاعاتی که در بالا ارائه دادیم یک نمای خوب از ویژگیهای فایربیس و گزینههایی که ارائه میدهد به شما داده باشد. حالا، میخواهیم نرمافزاری ساده بسازیم که پیامهای فایربیس را از هردو میزکار firebase و php code دریافت کند.
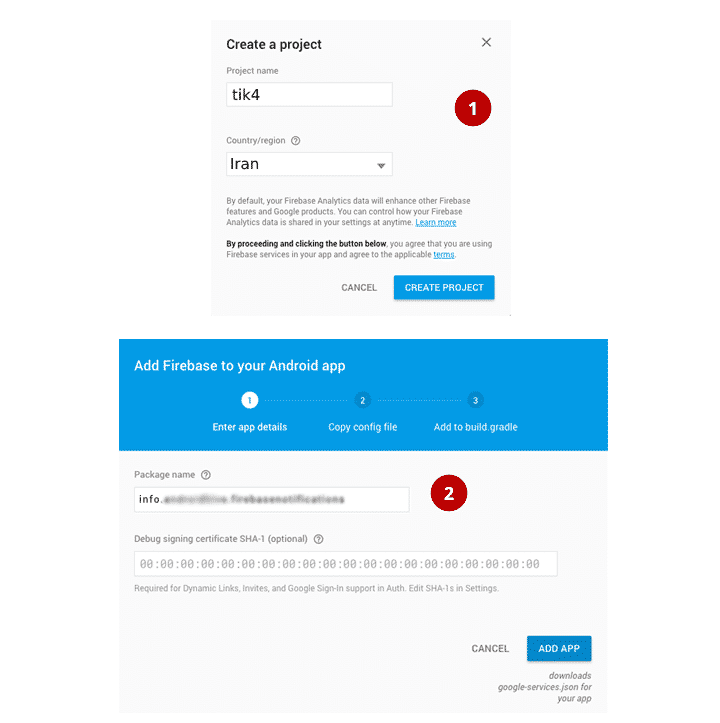
- اولین کاری که باید بکنید این است که به سایت https://firebase.google.com/ رفته و برای دسترسی به میزکار firebase یک حسابکاربری بسازید. وقتی که به میزکار خود دسترسی پیدا کردید میتوانید با ساخت اولین پروژه (پیامرسانی) خود شروع به کار کنید.
- نامی (package name) را بر روی پروژه خود که میخواهید با firebase ادغام کنید و آن را در فایربیس وارد کنید. حالا در صورتی که روی کلید add app بزنید و فایل google-services.json را دانلود کنید.
- در نرم افزار android studio از بخش File ⇒ New Project یک پروژه جدید باز میکنیم. هنگامی که اطلاعات پروژه را وارد میکنید، از همان نامی استفاده کنید که در میز کار firebase استفاده کردید.
- فایل google-services.json را در قایل app کپی کنید. این مرحله از اهمیت بالایی برخوردار است زیرا شما نمیتوانید پروژه خود را بدون این فایل بسازید.
- حالا بخش build.gradle را در فهرست اصلی مربوط به پروژه باز کرده و firebase dependency را اضافه کنید.
build.gradle
dependencies {
        classpath 'com.android.tools.build:gradle:2.2.0-rc1'
        classpath 'com.google.gms:google-services:3.0.0'

        // NOTE: Do not place your application dependencies here; they belong
        // in the individual module build.gradle files
    }
- app/build.gradle را باز کرده و در بخش depency کد مربوط به firebase messaging را وارد کنید. در پایین ترین بخش صفحه، apply plugin: ‘com.google.gms.google-services’ را اظافه کنید.
app/build.gradle
dependencies {
    compile 'com.google.firebase:firebase-messaging:9.6.0'
}

apply plugin: 'com.google.gms.google-services'
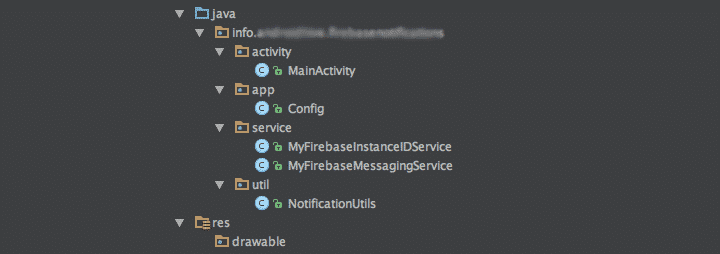
- چهار بسته (package) با نامهای app،activity ، service و utils در زیرمجموعه پوشه پروژه خود بسازید. در بخش زیر ساختار و فایل مورد نیاز برای این پروژه را مشاهده میکنید.
- فایل notification.mp3 را دانلود کرده و آن را در پوشه res ⇒ raw قرار دهید. این مرحله اختیاری است، اما اگر میخواهید همراه با اعلان شما افکت صوتی خاصی پخش شود از این گزینه استفاده کنید.
- یک class با نام config.java در زیرمجموعه بسته app بسازید. این class شامل تمام مقادیر ثابتی است که در تمام بخشهای مورد نیاز در برنامه استفاده میکنیم.
Config.java
package info.tik4.firebasenotifications.app;

public class Config {

    // global topic to receive app wide push notifications
    public static final String TOPIC_GLOBAL = "global";

    // broadcast receiver intent filters
    public static final String REGISTRATION_COMPLETE = "registrationComplete";
    public static final String PUSH_NOTIFICATION = "pushNotification";

    // id to handle the notification in the notification tray
    public static final int NOTIFICATION_ID = 100;
    public static final int NOTIFICATION_ID_BIG_IMAGE = 101;

    public static final String SHARED_PREF = "ah_firebase";
}
- یک class با نام NotificationUtils.java در زیرمجموعه بستهی utils بسازید. این کلاس شامل تابعهای (functions) لازم برای نمایش پیام(همراه با عنوان، پیام، تصویر و نشانگر زمان) در جایگاه اعلان در گوشی (notification tray) میباشد.
NotificationUtils.java
package info.tik4.firebasenotifications.util;

import android.app.ActivityManager;
import android.app.Notification;
import android.app.NotificationManager;
import android.app.PendingIntent;
import android.content.ComponentName;
import android.content.ContentResolver;
import android.content.Context;
import android.content.Intent;
import android.graphics.Bitmap;
import android.graphics.BitmapFactory;
import android.media.Ringtone;
import android.media.RingtoneManager;
import android.net.Uri;
import android.os.Build;
import android.support.v4.app.NotificationCompat;
import android.text.Html;
import android.text.TextUtils;
import android.util.Patterns;

import java.io.IOException;
import java.io.InputStream;
import java.net.HttpURLConnection;
import java.net.URL;
import java.text.ParseException;
import java.text.SimpleDateFormat;
import java.util.Date;
import java.util.List;

import info.tik4.firebasenotifications.R;
import info.tik4.firebasenotifications.app.Config;

/**
 * Created by Ravi on 31/03/15.
 */
public class NotificationUtils {

    private static String TAG = NotificationUtils.class.getSimpleName();

    private Context mContext;

    public NotificationUtils(Context mContext) {
        this.mContext = mContext;
    }

    public void showNotificationMessage(String title, String message, String timeStamp, Intent intent) {
        showNotificationMessage(title, message, timeStamp, intent, null);
    }

    public void showNotificationMessage(final String title, final String message, final String timeStamp, Intent intent, String imageUrl) {
        // Check for empty push message
        if (TextUtils.isEmpty(message))
            return;


        // notification icon
        final int icon = R.mipmap.ic_launcher;

        intent.setFlags(Intent.FLAG_ACTIVITY_CLEAR_TOP | Intent.FLAG_ACTIVITY_SINGLE_TOP);
        final PendingIntent resultPendingIntent =
                PendingIntent.getActivity(
                        mContext,
                        0,
                        intent,
                        PendingIntent.FLAG_CANCEL_CURRENT
                );

        final NotificationCompat.Builder mBuilder = new NotificationCompat.Builder(
                mContext);

        final Uri alarmSound = Uri.parse(ContentResolver.SCHEME_ANDROID_RESOURCE
                + "://" + mContext.getPackageName() + "/raw/notification");

        if (!TextUtils.isEmpty(imageUrl)) {

            if (imageUrl != null && imageUrl.length() > 4 && Patterns.WEB_URL.matcher(imageUrl).matches()) {

                Bitmap bitmap = getBitmapFromURL(imageUrl);

                if (bitmap != null) {
                    showBigNotification(bitmap, mBuilder, icon, title, message, timeStamp, resultPendingIntent, alarmSound);
                } else {
                    showSmallNotification(mBuilder, icon, title, message, timeStamp, resultPendingIntent, alarmSound);
                }
            }
        } else {
            showSmallNotification(mBuilder, icon, title, message, timeStamp, resultPendingIntent, alarmSound);
            playNotificationSound();
        }
    }


    private void showSmallNotification(NotificationCompat.Builder mBuilder, int icon, String title, String message, String timeStamp, PendingIntent resultPendingIntent, Uri alarmSound) {

        NotificationCompat.InboxStyle inboxStyle = new NotificationCompat.InboxStyle();

        inboxStyle.addLine(message);

        Notification notification;
        notification = mBuilder.setSmallIcon(icon).setTicker(title).setWhen(0)
                .setAutoCancel(true)
                .setContentTitle(title)
                .setContentIntent(resultPendingIntent)
                .setSound(alarmSound)
                .setStyle(inboxStyle)
                .setWhen(getTimeMilliSec(timeStamp))
                .setSmallIcon(R.mipmap.ic_launcher)
                .setLargeIcon(BitmapFactory.decodeResource(mContext.getResources(), icon))
                .setContentText(message)
                .build();

        NotificationManager notificationManager = (NotificationManager) mContext.getSystemService(Context.NOTIFICATION_SERVICE);
        notificationManager.notify(Config.NOTIFICATION_ID, notification);
    }

    private void showBigNotification(Bitmap bitmap, NotificationCompat.Builder mBuilder, int icon, String title, String message, String timeStamp, PendingIntent resultPendingIntent, Uri alarmSound) {
        NotificationCompat.BigPictureStyle bigPictureStyle = new NotificationCompat.BigPictureStyle();
        bigPictureStyle.setBigContentTitle(title);
        bigPictureStyle.setSummaryText(Html.fromHtml(message).toString());
        bigPictureStyle.bigPicture(bitmap);
        Notification notification;
        notification = mBuilder.setSmallIcon(icon).setTicker(title).setWhen(0)
                .setAutoCancel(true)
                .setContentTitle(title)
                .setContentIntent(resultPendingIntent)
                .setSound(alarmSound)
                .setStyle(bigPictureStyle)
                .setWhen(getTimeMilliSec(timeStamp))
                .setSmallIcon(R.mipmap.ic_launcher)
                .setLargeIcon(BitmapFactory.decodeResource(mContext.getResources(), icon))
                .setContentText(message)
                .build();

        NotificationManager notificationManager = (NotificationManager) mContext.getSystemService(Context.NOTIFICATION_SERVICE);
        notificationManager.notify(Config.NOTIFICATION_ID_BIG_IMAGE, notification);
    }

    /**
     * Downloading push notification image before displaying it in
     * the notification tray
     */
    public Bitmap getBitmapFromURL(String strURL) {
        try {
            URL url = new URL(strURL);
            HttpURLConnection connection = (HttpURLConnection) url.openConnection();
            connection.setDoInput(true);
            connection.connect();
            InputStream input = connection.getInputStream();
            Bitmap myBitmap = BitmapFactory.decodeStream(input);
            return myBitmap;
        } catch (IOException e) {
            e.printStackTrace();
            return null;
        }
    }

    // Playing notification sound
    public void playNotificationSound() {
        try {
            Uri alarmSound = Uri.parse(ContentResolver.SCHEME_ANDROID_RESOURCE
                    + "://" + mContext.getPackageName() + "/raw/notification");
            Ringtone r = RingtoneManager.getRingtone(mContext, alarmSound);
            r.play();
        } catch (Exception e) {
            e.printStackTrace();
        }
    }

    /**
     * Method checks if the app is in background or not
     */
    public static boolean isAppIsInBackground(Context context) {
        boolean isInBackground = true;
        ActivityManager am = (ActivityManager) context.getSystemService(Context.ACTIVITY_SERVICE);
        if (Build.VERSION.SDK_INT > Build.VERSION_CODES.KITKAT_WATCH) {
            List<ActivityManager.RunningAppProcessInfo> runningProcesses = am.getRunningAppProcesses();
            for (ActivityManager.RunningAppProcessInfo processInfo : runningProcesses) {
                if (processInfo.importance == ActivityManager.RunningAppProcessInfo.IMPORTANCE_FOREGROUND) {
                    for (String activeProcess : processInfo.pkgList) {
                        if (activeProcess.equals(context.getPackageName())) {
                            isInBackground = false;
                        }
                    }
                }
            }
        } else {
            List<ActivityManager.RunningTaskInfo> taskInfo = am.getRunningTasks(1);
            ComponentName componentInfo = taskInfo.get(0).topActivity;
            if (componentInfo.getPackageName().equals(context.getPackageName())) {
                isInBackground = false;
            }
        }

        return isInBackground;
    }

    // Clears notification tray messages
    public static void clearNotifications(Context context) {
        NotificationManager notificationManager = (NotificationManager) context.getSystemService(Context.NOTIFICATION_SERVICE);
        notificationManager.cancelAll();
    }

    public static long getTimeMilliSec(String timeStamp) {
        SimpleDateFormat format = new SimpleDateFormat("yyyy-MM-dd HH:mm:ss");
        try {
            Date date = format.parse(timeStamp);
            return date.getTime();
        } catch (ParseException e) {
            e.printStackTrace();
        }
        return 0;
    }
}
11. Create a class named
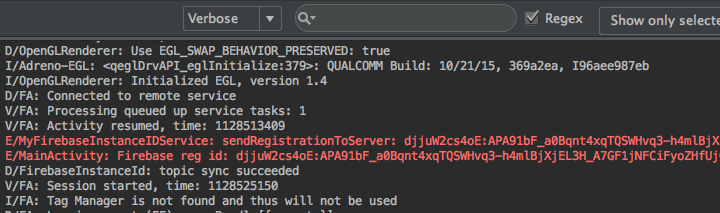
- یک class با نام MyFirebaseInstanceIDService.java در زیرمجموعه بسته service بسازید. این class وظیفه دریافت شناسه ثبتنامی فایربیس (firebase registration id) را دارد که برای هر نرمافزار منحصر به فرد خواهد بود. این شناسه ثبتنامی (registration id) برای ارسال پیام به یک دستگاه یا کاربر مورد نیاز خواهد بود. شما این دستور را میتوانید به نرمافزار سرور (server app) خود بفرستید تا بعدا اعلان ها را بفرستد.
روش onTokenRefresh() هنگام تغییر در شناسه ثبتنامی در firebase استفاده میشود.
storeRegIdInPref() شناسه ثبتنامی را در بخش shared preferences ذخیره میکند.
LocalBroadcastManager– broadcast manager شناسه ثبتنامی را به تمام فعالیتهای در حال اجرا میفرستد.
MyFirebaseInstanceIDService.java
package info.tik4.firebasenotifications.service;

import android.content.Intent;
import android.content.SharedPreferences;
import android.support.v4.content.LocalBroadcastManager;
import android.util.Log;

import com.google.firebase.iid.FirebaseInstanceId;
import com.google.firebase.iid.FirebaseInstanceIdService;

import info.tik4.firebasenotifications.app.Config;

/**
 * Created by Ravi Tamada on 08/08/16.
 * www.tik4.info
 */
public class MyFirebaseInstanceIDService extends FirebaseInstanceIdService {
    private static final String TAG = MyFirebaseInstanceIDService.class.getSimpleName();

    @Override
    public void onTokenRefresh() {
        super.onTokenRefresh();
        String refreshedToken = FirebaseInstanceId.getInstance().getToken();

        // Saving reg id to shared preferences
        storeRegIdInPref(refreshedToken);

        // sending reg id to your server
        sendRegistrationToServer(refreshedToken);

        // Notify UI that registration has completed, so the progress indicator can be hidden.
        Intent registrationComplete = new Intent(Config.REGISTRATION_COMPLETE);
        registrationComplete.putExtra("token", refreshedToken);
        LocalBroadcastManager.getInstance(this).sendBroadcast(registrationComplete);
    }

    private void sendRegistrationToServer(final String token) {
        // sending gcm token to server
        Log.e(TAG, "sendRegistrationToServer: " + token);
    }

    private void storeRegIdInPref(String token) {
        SharedPreferences pref = getApplicationContext().getSharedPreferences(Config.SHARED_PREF, 0);
        SharedPreferences.Editor editor = pref.edit();
        editor.putString("regId", token);
        editor.commit();
    }
}
12.class دیگری را با نام MyFirebaseMessagingService.java در زیرمجموعه بسته service بسازید. این class پیامهای فایربیس را با روش onMessageReceived() دریافت میکند.
- وقتی نوع همراه با اعلان پیام( notification type message) فرستاده میشود، فایربیس به صورت خودکار اعلان را هنگامی که نرمافزار در background است به نمایش میگذارد. اگر نرمافزار در foreground باشد، روش handleNotification() پیام همراه با اعلان را پردازش میکند.
- وقتی نوع همراه با داده پیام (data type message) فرستاده میشود روش handleDataMessage() برای پردازش محتوا البته بدون توجه به وضعیت نرمافزار(وضعیت back ground یا foreground) استفاده میشود.
- LocalBroadcastManager برای پخش پیام به تمام فعالیتهایی که در گیرندههای پخش (broadcast receiver) ثبت شدهاند استفاده میشود.
MyFirebaseMessagingService.java
package info.tik4.firebasenotifications.service;

import android.content.Context;
import android.content.Intent;
import android.support.v4.content.LocalBroadcastManager;
import android.text.TextUtils;
import android.util.Log;

import com.google.firebase.messaging.FirebaseMessagingService;
import com.google.firebase.messaging.RemoteMessage;

import org.json.JSONException;
import org.json.JSONObject;

import info.tik4.firebasenotifications.activity.MainActivity;
import info.tik4.firebasenotifications.app.Config;
import info.tik4.firebasenotifications.util.NotificationUtils;

/**
 * Created by Ravi Tamada on 08/08/16.
 * www.tik4.info
 */
public class MyFirebaseMessagingService extends FirebaseMessagingService {

    private static final String TAG = MyFirebaseMessagingService.class.getSimpleName();

    private NotificationUtils notificationUtils;

    @Override
    public void onMessageReceived(RemoteMessage remoteMessage) {
        Log.e(TAG, "From: " + remoteMessage.getFrom());

        if (remoteMessage == null)
            return;

        // Check if message contains a notification payload.
        if (remoteMessage.getNotification() != null) {
            Log.e(TAG, "Notification Body: " + remoteMessage.getNotification().getBody());
            handleNotification(remoteMessage.getNotification().getBody());
        }

        // Check if message contains a data payload.
        if (remoteMessage.getData().size() > 0) {
            Log.e(TAG, "Data Payload: " + remoteMessage.getData().toString());

            try {
                JSONObject json = new JSONObject(remoteMessage.getData().toString());
                handleDataMessage(json);
            } catch (Exception e) {
                Log.e(TAG, "Exception: " + e.getMessage());
            }
        }
    }

    private void handleNotification(String message) {
        if (!NotificationUtils.isAppIsInBackground(getApplicationContext())) {
            // app is in foreground, broadcast the push message
            Intent pushNotification = new Intent(Config.PUSH_NOTIFICATION);
            pushNotification.putExtra("message", message);
            LocalBroadcastManager.getInstance(this).sendBroadcast(pushNotification);

            // play notification sound
            NotificationUtils notificationUtils = new NotificationUtils(getApplicationContext());
            notificationUtils.playNotificationSound();
        }else{
            // If the app is in background, firebase itself handles the notification
        }
    }

    private void handleDataMessage(JSONObject json) {
        Log.e(TAG, "push json: " + json.toString());

        try {
            JSONObject data = json.getJSONObject("data");

            String title = data.getString("title");
            String message = data.getString("message");
            boolean isBackground = data.getBoolean("is_background");
            String imageUrl = data.getString("image");
            String timestamp = data.getString("timestamp");
            JSONObject payload = data.getJSONObject("payload");

            Log.e(TAG, "title: " + title);
            Log.e(TAG, "message: " + message);
            Log.e(TAG, "isBackground: " + isBackground);
            Log.e(TAG, "payload: " + payload.toString());
            Log.e(TAG, "imageUrl: " + imageUrl);
            Log.e(TAG, "timestamp: " + timestamp);


            if (!NotificationUtils.isAppIsInBackground(getApplicationContext())) {
                // app is in foreground, broadcast the push message
                Intent pushNotification = new Intent(Config.PUSH_NOTIFICATION);
                pushNotification.putExtra("message", message);
                LocalBroadcastManager.getInstance(this).sendBroadcast(pushNotification);

                // play notification sound
                NotificationUtils notificationUtils = new NotificationUtils(getApplicationContext());
                notificationUtils.playNotificationSound();
            } else {
                // app is in background, show the notification in notification tray
                Intent resultIntent = new Intent(getApplicationContext(), MainActivity.class);
                resultIntent.putExtra("message", message);

                // check for image attachment
                if (TextUtils.isEmpty(imageUrl)) {
                    showNotificationMessage(getApplicationContext(), title, message, timestamp, resultIntent);
                } else {
                    // image is present, show notification with image
                    showNotificationMessageWithBigImage(getApplicationContext(), title, message, timestamp, resultIntent, imageUrl);
                }
            }
        } catch (JSONException e) {
            Log.e(TAG, "Json Exception: " + e.getMessage());
        } catch (Exception e) {
            Log.e(TAG, "Exception: " + e.getMessage());
        }
    }

    /**
     * Showing notification with text only
     */
    private void showNotificationMessage(Context context, String title, String message, String timeStamp, Intent intent) {
        notificationUtils = new NotificationUtils(context);
        intent.setFlags(Intent.FLAG_ACTIVITY_NEW_TASK | Intent.FLAG_ACTIVITY_CLEAR_TASK);
        notificationUtils.showNotificationMessage(title, message, timeStamp, intent);
    }

    /**
     * Showing notification with text and image
     */
    private void showNotificationMessageWithBigImage(Context context, String title, String message, String timeStamp, Intent intent, String imageUrl) {
        notificationUtils = new NotificationUtils(context);
        intent.setFlags(Intent.FLAG_ACTIVITY_NEW_TASK | Intent.FLAG_ACTIVITY_CLEAR_TASK);
        notificationUtils.showNotificationMessage(title, message, timeStamp, intent, imageUrl);
    }
}
- AndroidManifest.xml را باز کرده و دو سرویس فایربیس با نامهای MyFirebaseMessagingService و MyFirebaseInstanceIDService را اضافه کنید.
AndroidManifest.xml
<?xml version="1.0" encoding="utf-8"?>
<manifest xmlns:android="http://schemas.android.com/apk/res/android"
    package="info.tik4.firebasenotifications">

    <application
        android:allowBackup="true"
        android:icon="@mipmap/ic_launcher"
        android:label="@string/app_name"
        android:supportsRtl="true"
        android:theme="@style/AppTheme">
        <activity
            android:name=".activity.MainActivity"
            android:label="@string/title_main_activity">
            <intent-filter>
                <action android:name="android.intent.action.MAIN" />

                <category android:name="android.intent.category.LAUNCHER" />
            </intent-filter>
        </activity>

        <!-- Firebase Notifications -->
        <service android:name=".service.MyFirebaseMessagingService">
            <intent-filter>
                <action android:name="com.google.firebase.MESSAGING_EVENT" />
            </intent-filter>
        </service>

        <service android:name=".service.MyFirebaseInstanceIDService">
            <intent-filter>
                <action android:name="com.google.firebase.INSTANCE_ID_EVENT" />
            </intent-filter>
        </service>
        <!-- ./Firebase Notifications -->
    </application>
</manifest>
- در نهایت ما باید فعالیت اصلی خود را تغییر بدهیم تا پیامهای ورودی را در صفحه نشان بدهد. فایل طرح (layout file) فعالیت اصلی یعنی activity_main.xml را باز کرده و طرح را مانند زیر تغییر بدهید.
activity_main.xml
<?xml version="1.0" encoding="utf-8"?>
<RelativeLayout xmlns:android="http://schemas.android.com/apk/res/android"
    xmlns:tools="http://schemas.android.com/tools"
    android:id="@+id/activity_main"
    android:layout_width="match_parent"
    android:layout_height="match_parent"
    android:paddingBottom="@dimen/activity_vertical_margin"
    android:paddingLeft="@dimen/activity_horizontal_margin"
    android:paddingRight="@dimen/activity_horizontal_margin"
    android:paddingTop="@dimen/activity_vertical_margin"
    tools:context="info.tik4.firebasenotifications.activity.MainActivity">

    <TextView
        android:id="@+id/txt_push_message"
        android:layout_width="wrap_content"
        android:layout_height="wrap_content"
        android:layout_alignParentTop="true"
        android:layout_centerHorizontal="true"
        android:layout_marginTop="40dp"
        android:gravity="center_horizontal"
        android:textColor="@color/colorPrimary"
        android:textSize="26dp" />

    <TextView
        android:id="@+id/txt_reg_id"
        android:layout_width="wrap_content"
        android:layout_height="wrap_content"
        android:layout_alignParentBottom="true" />
</RelativeLayout>
- MainActivity.java را بازکرده و تغییرات الزامی زیر را اعمال کنید. ما در روش onResume() دریافت کنندههای پخش (پیام) را ثبت میکنیم تا این فعالیت پیام های push و شناسه ثبتنامی را دریافت کند.
displayFirebaseRegId() شناسه ثبتنامی firebase را از تنظیمات به اشتراک گذاشته شده دریافت کرده و آنها را در صفحه نمایش میدهد. البته این فقط برای این است که اطلاع داشته باشید؛ ما در هیچ بخشی نرمافزار از شناسه ثبتتام استفاده نخواهیم کرد.
مشترک یک موضوع (topic) شدن
اگر بخواهید مشترک هر topic بشوید از تابع subscribeToTopic() میتوانید استفاده کنید. وقتی یک نرمافزار بهرهمند (client app) مشترک topic جدیدی میشود (یک topic که تابهحال در پروژه firebase شما نبوده است)، یک topic با همان نام در FCM ساخته میشود و هر بهرهمندی (client) میتواند متعاقباً مشترک آن بشود.
FirebaseMessaging.getInstance().subscribeToTopic('news');
لغو اشتراک یک topic
به همان شیوه قبل یک کلاینت میتواند اشتراک خود در یک topic را با فراخوانی روش unsubscribeFromTopic() لغو کند.
FirebaseMessaging.getInstance().unsubscribeFromTopic('news');
MainActivity.java
package info.tik4.firebasenotifications.activity;

import android.content.BroadcastReceiver;
import android.content.Context;
import android.content.Intent;
import android.content.IntentFilter;
import android.content.SharedPreferences;
import android.os.Bundle;
import android.support.v4.content.LocalBroadcastManager;
import android.support.v7.app.AppCompatActivity;
import android.text.TextUtils;
import android.util.Log;
import android.widget.TextView;
import android.widget.Toast;

import com.google.firebase.messaging.FirebaseMessaging;

import info.tik4.firebasenotifications.R;
import info.tik4.firebasenotifications.app.Config;
import info.tik4.firebasenotifications.util.NotificationUtils;

public class MainActivity extends AppCompatActivity {

    private static final String TAG = MainActivity.class.getSimpleName();
    private BroadcastReceiver mRegistrationBroadcastReceiver;
    private TextView txtRegId, txtMessage;

    @Override
    protected void onCreate(Bundle savedInstanceState) {
        super.onCreate(savedInstanceState);
        setContentView(R.layout.activity_main);

        txtRegId = (TextView) findViewById(R.id.txt_reg_id);
        txtMessage = (TextView) findViewById(R.id.txt_push_message);

        mRegistrationBroadcastReceiver = new BroadcastReceiver() {
            @Override
            public void onReceive(Context context, Intent intent) {

                // checking for type intent filter
                if (intent.getAction().equals(Config.REGISTRATION_COMPLETE)) {
                    // gcm successfully registered
                    // now subscribe to `global` topic to receive app wide notifications
                    FirebaseMessaging.getInstance().subscribeToTopic(Config.TOPIC_GLOBAL);

                    displayFirebaseRegId();

                } else if (intent.getAction().equals(Config.PUSH_NOTIFICATION)) {
                    // new push notification is received

                    String message = intent.getStringExtra("message");

                    Toast.makeText(getApplicationContext(), "Push notification: " + message, Toast.LENGTH_LONG).show();

                    txtMessage.setText(message);
                }
            }
        };

        displayFirebaseRegId();
    }

    // Fetches reg id from shared preferences
    // and displays on the screen
    private void displayFirebaseRegId() {
        SharedPreferences pref = getApplicationContext().getSharedPreferences(Config.SHARED_PREF, 0);
        String regId = pref.getString("regId", null);

        Log.e(TAG, "Firebase reg id: " + regId);

        if (!TextUtils.isEmpty(regId))
            txtRegId.setText("Firebase Reg Id: " + regId);
        else
            txtRegId.setText("Firebase Reg Id is not received yet!");
    }

    @Override
    protected void onResume() {
        super.onResume();

        // register GCM registration complete receiver
        LocalBroadcastManager.getInstance(this).registerReceiver(mRegistrationBroadcastReceiver,
                new IntentFilter(Config.REGISTRATION_COMPLETE));

        // register new push message receiver
        // by doing this, the activity will be notified each time a new message arrives
        LocalBroadcastManager.getInstance(this).registerReceiver(mRegistrationBroadcastReceiver,
                new IntentFilter(Config.PUSH_NOTIFICATION));

        // clear the notification area when the app is opened
        NotificationUtils.clearNotifications(getApplicationContext());
    }

    @Override
    protected void onPause() {
        LocalBroadcastManager.getInstance(this).unregisterReceiver(mRegistrationBroadcastReceiver);
        super.onPause();
    }
}
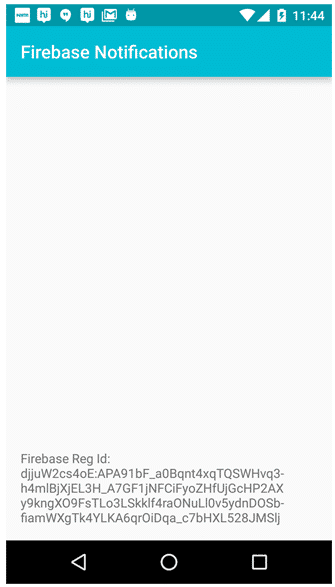
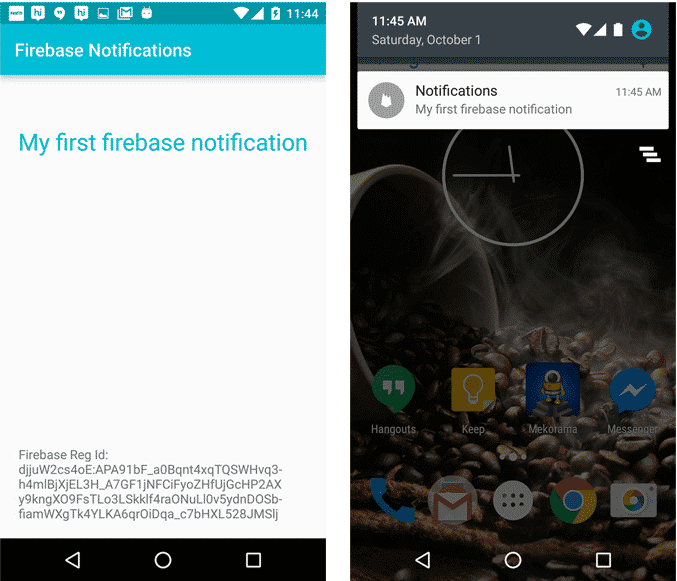
اکنون، ادغام firebase cloud messaging را به پایان رساندیم. برای تأیید آن، پروژه را اجرا کنید و ببینید که شناسه ثبتنامی فایربیس روی صفحه به نمایش گذاشته میشود. شما میتوانید شناسه ثبتنامی را در بخش logcat نیز ببینید. با مقاله آموزش فایربیس و آموزش Push Notifications به وسیله فایربیس باما همراه باشید.
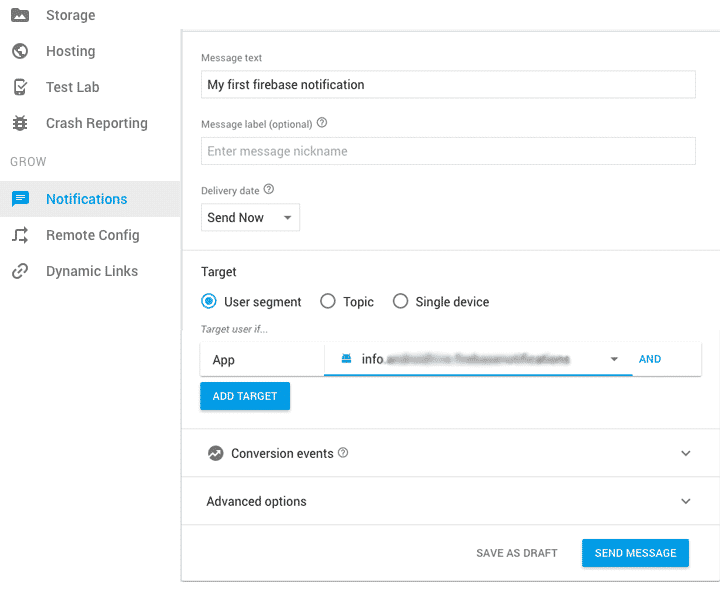
4. ارسال پیام از میزکار firebase
اکنون، میخواهیم اولین پیام را از میز کار فایربیس بفرستیم. به میز کار firebase بروید و روی Notifications در فهرست (menu) سمت چپ کلیک کنید. شما رابط کاربری را دریافت خواهید کرد که میتوانید در آن پیام خود را تایپ کنید، افراد هدف را انتخاب کنید و پیام خود را ارسال کنید.
5. ارسال پیام از بکاند php(PHP backend)
ارسال پیام از میزکار firebase همواره راهحلی بهینه (برای ارسال پیام) در بسیاری از نرمافزارها نیست. تعداد قابل توجهی از نرمافزارها به این قضیه نیاز دارند که در هنگام رخ دادن هر رویدادی بهطور خودکار اعلان دریافت کنند، که نمیتوان با استفاده از میزکار فایربیس این را عملی کرد. برای حل این مشکل، شما باید فرایند ادغام firebase API را از سرور بکاند (backend server) خود انجام بدهید.
بیایید یک پروژه ساده PHP بسازیم تا از backend پیام ارسال کنیم. ما با فرض این که شما از PHP و WAMP اطلاعات پایهای دارید جلو میرویم. با مقاله آموزش فایربیس و آموزش Push Notifications به وسیله فایربیس باما همراه باشید.
5.1 بدست آوردن Firebase Server API Key خودتان
فایربیس برای شناسایی نرمافزار firebase خودتان Server API Key را برای شما فراهم میکند. برای دریافت Server API Key خود ، به میزکار فایربیس رفته، و پروژه خود را انتخاب کنید و به بخش تنظیمات (settings) بروید، سربرگ (tab) Cloud Messaging را انتخاب کرده و Server Key خود را کپی کنید.

1.به فهرست WAMP خود رفته و پوشه جدیدی با نام firebase داخل htdocs یا www. بسازید.
فایلی (file) با نام config.php بسازید و کد زیر را وراد کنید.در این جا ما firebase API key را برای ارسال درخواست به firebase end point تعریف میکنیم.
config.php
<?php

// Firebase API Key
define('FIREBASE_API_KEY', 'AAAA4qJeE5A:APA91bGct--6lGrYwgBC8iz5reyx4qPUB7ByXX8MwC7Vcs8u...');
فایلی با نام push.php بسازید. این class مسئول آماده سازی push notification json است که قرار است به فایربیس فرستاده شود.
push.php
<?php

/**
 * @author Ravi Tamada
 * @link URL Tutorial link
 */
class Push {

    // push message title
    private $title;
    private $message;
    private $image;
    // push message payload
    private $data;
    // flag indicating whether to show the push
    // notification or not
    // this flag will be useful when perform some opertation
    // in background when push is recevied
    private $is_background;

    function __construct() {

    }

    public function setTitle($title) {
        $this->title = $title;
    }

    public function setMessage($message) {
        $this->message = $message;
    }

    public function setImage($imageUrl) {
        $this->image = $imageUrl;
    }

    public function setPayload($data) {
        $this->data = $data;
    }

    public function setIsBackground($is_background) {
        $this->is_background = $is_background;
    }

    public function getPush() {
        $res = array();
        $res['data']['title'] = $this->title;
        $res['data']['is_background'] = $this->is_background;
        $res['data']['message'] = $this->message;
        $res['data']['image'] = $this->image;
        $res['data']['payload'] = $this->data;
        $res['data']['timestamp'] = date('Y-m-d G:i:s');
        return $res;
    }

}
- فایلی با نام firebase.php بسازید و کد زیر را وارد کنید. این class شامل توابع(فرمولهای) لازم برای ارسال پیام به firbase API با درخواست CURL است.
<?php

/**
 * @author Ravi Tamada
 * @link URL Tutorial link
 */
class Firebase {

    // sending push message to single user by firebase reg id
    public function send($to, $message) {
        $fields = array(
            'to' => $to,
            'data' => $message,
        );
        return $this->sendPushNotification($fields);
    }

    // Sending message to a topic by topic name
    public function sendToTopic($to, $message) {
        $fields = array(
            'to' => '/topics/' . $to,
            'data' => $message,
        );
        return $this->sendPushNotification($fields);
    }

    // sending push message to multiple users by firebase registration ids
    public function sendMultiple($registration_ids, $message) {
        $fields = array(
            'to' => $registration_ids,
            'data' => $message,
        );

        return $this->sendPushNotification($fields);
    }

    // function makes curl request to firebase servers
    private function sendPushNotification($fields) {

        require_once __DIR__ . '/config.php';

        // Set POST variables
        $url = 'https://fcm.googleapis.com/fcm/send';

        $headers = array(
            'Authorization: key=' . FIREBASE_API_KEY,
            'Content-Type: application/json'
        );
        // Open connection
        $ch = curl_init();

        // Set the url, number of POST vars, POST data
        curl_setopt($ch, CURLOPT_URL, $url);

        curl_setopt($ch, CURLOPT_POST, true);
        curl_setopt($ch, CURLOPT_HTTPHEADER, $headers);
        curl_setopt($ch, CURLOPT_RETURNTRANSFER, true);

        // Disabling SSL Certificate support temporarly
        curl_setopt($ch, CURLOPT_SSL_VERIFYPEER, false);

        curl_setopt($ch, CURLOPT_POSTFIELDS, json_encode($fields));

        // Execute post
        $result = curl_exec($ch);
        if ($result === FALSE) {
            die('Curl failed: ' . curl_error($ch));
        }

        // Close connection
        curl_close($ch);

        return $result;
    }
}
?>
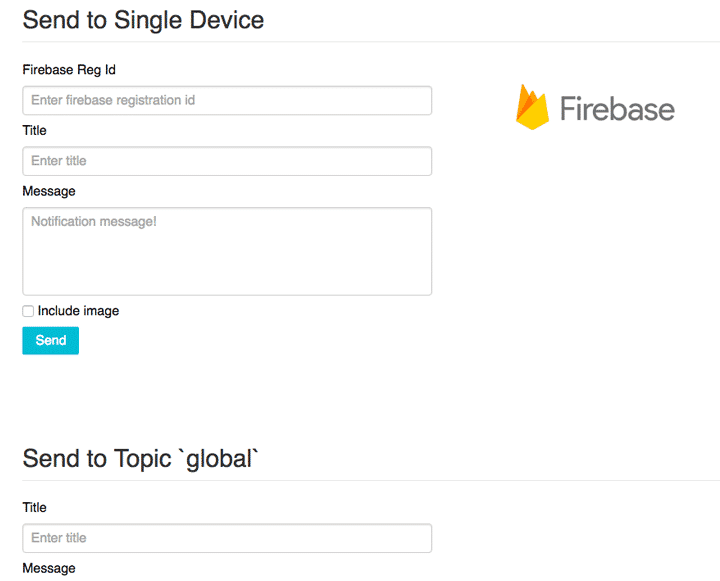
- در نهایت یک index.php بسازید و کد زیر را وارد کنید. در اینجا ما یک رابط کاربری ساده میسازیم که ورودی (input) ما را دریافت کرده و اعلان را به دستگاه اندرویدی میفرستد.
index.php
<html>
    <head>
        <title>tik4 | Firebase Cloud Messaging</title>
        <meta charset="UTF-8">
        <meta name="viewport" content="width=device-width, initial-scale=1.0">
        <link rel="shortcut icon" href="//www.gstatic.com/mobilesdk/160503_mobilesdk/logo/favicon.ico">
        <link rel="stylesheet" href="http://yui.yahooapis.com/pure/0.6.0/pure-min.css">

        <style type="text/css">
            body{
            }
            div.container{
                width: 1000px;
                margin: 0 auto;
                position: relative;
            }
            legend{
                font-size: 30px;
                color: #555;
            }
            .btn_send{
                background: #00bcd4;
            }
            label{
                margin:10px 0px !important;
            }
            textarea{
                resize: none !important;
            }
            .fl_window{
                width: 400px;
                position: absolute;
                right: 0;
                top:100px;
            }
            pre, code {
                padding:10px 0px;
                box-sizing:border-box;
                -moz-box-sizing:border-box;
                webkit-box-sizing:border-box;
                display:block;
                white-space: pre-wrap;
                white-space: -moz-pre-wrap;
                white-space: -pre-wrap;
                white-space: -o-pre-wrap;
                word-wrap: break-word;
                width:100%; overflow-x:auto;
            }

        </style>
    </head>
    <body>
        <?php
        // Enabling error reporting
        error_reporting(-1);
        ini_set('display_errors', 'On');

        require_once __DIR__ . '/firebase.php';
        require_once __DIR__ . '/push.php';

        $firebase = new Firebase();
        $push = new Push();

        // optional payload
        $payload = array();
        $payload['team'] = 'India';
        $payload['score'] = '5.6';

        // notification title
        $title = isset($_GET['title']) ? $_GET['title'] : '';

        // notification message
        $message = isset($_GET['message']) ? $_GET['message'] : '';

        // push type - single user / topic
        $push_type = isset($_GET['push_type']) ? $_GET['push_type'] : '';

        // whether to include to image or not
        $include_image = isset($_GET['include_image']) ? TRUE : FALSE;


        $push->setTitle($title);
        $push->setMessage($message);
        if ($include_image) {
            $push->setImage('https://api.tik4.info/images/minion.jpg');
        } else {
            $push->setImage('');
        }
        $push->setIsBackground(FALSE);
        $push->setPayload($payload);


        $json = '';
        $response = '';

        if ($push_type == 'topic') {
            $json = $push->getPush();
            $response = $firebase->sendToTopic('global', $json);
        } else if ($push_type == 'individual') {
            $json = $push->getPush();
            $regId = isset($_GET['regId']) ? $_GET['regId'] : '';
            $response = $firebase->send($regId, $json);
        }
        ?>
        <div class="container">
            <div class="fl_window">
                <div><img src="https://api.tik4.info/images/firebase_logo.png" width="200" alt="Firebase"/></div>
                <br/>
                <?php if ($json != '') { ?>
                    <label><b>Request:</b></label>
                    <div class="json_preview">
                        <pre><?php echo json_encode($json) ?></pre>
                    </div>
                <?php } ?>
                <br/>
                <?php if ($response != '') { ?>
                    <label><b>Response:</b></label>
                    <div class="json_preview">
                        <pre><?php echo json_encode($response) ?></pre>
                    </div>
                <?php } ?>

            </div>

            <form class="pure-form pure-form-stacked" method="get">
                <fieldset>
                    <legend>Send to Single Device</legend>

                    <label for="redId">Firebase Reg Id</label>
                    <input type="text" id="redId" name="regId" class="pure-input-1-2" placeholder="Enter firebase registration id">

                    <label for="title">Title</label>
                    <input type="text" id="title" name="title" class="pure-input-1-2" placeholder="Enter title">

                    <label for="message">Message</label>
                    <textarea class="pure-input-1-2" rows="5" name="message" id="message" placeholder="Notification message!"></textarea>

                    <label for="include_image" class="pure-checkbox">
                        <input name="include_image" id="include_image" type="checkbox"> Include image
                    </label>
                    <input type="hidden" name="push_type" value="individual"/>
                    <button type="submit" class="pure-button pure-button-primary btn_send">Send</button>
                </fieldset>
            </form>
            <br/><br/><br/><br/>

            <form class="pure-form pure-form-stacked" method="get">
                <fieldset>
                    <legend>Send to Topic `global`</legend>

                    <label for="title1">Title</label>
                    <input type="text" id="title1" name="title" class="pure-input-1-2" placeholder="Enter title">

                    <label for="message1">Message</label>
                    <textarea class="pure-input-1-2" name="message" id="message1" rows="5" placeholder="Notification message!"></textarea>

                    <label for="include_image1" class="pure-checkbox">
                        <input id="include_image1" name="include_image" type="checkbox"> Include image
                    </label>
                    <input type="hidden" name="push_type" value="topic"/>
                    <button type="submit" class="pure-button pure-button-primary btn_send">Send to Topic</button>
                </fieldset>
            </form>
        </div>
    </body>
</html>
- به پروژه خود از طریق آدرس اینترنتی http://localhost/firebase دسترسی پیدا کنید. (اگر apache شما در یک درگاه در حال اجرا است، به آدرس اینترنتی از طریق شماره درگاه دسترسی پیدا کنید)
امیدواریم از مقاله آموزش فایرباکس و آموزش Push Notifications به وسیله فایربیس بهره کافی را برده باشید. از قسمت دیدگاه ها باما در ارتباط باشید.
/ ۵
رای ثبت شده
امتیاز خود را ثبت کنید...